Selecting the License to Map
Use one of the following methods to select the license you want to identify as the user-preferred license.
| • | When Editing the Inventory Item |
| • | When Registering or Editing Instances in the Lookup Component Feature |
| • | When Creating a Custom Component Version |
When Editing the Inventory Item
You can access the Update License Mapping window within the context of the inventory item to which you are mapping the user-preferred license.
To access the Update License Mapping window by editing the inventory item, do the following:
| 1. | On the Inventory Details pane in Project Inventory, select the inventory item for whose component version you want to identify the user-preferred license, and then click the Edit Item button to open the Edit Inventory window. |
Or
On the Inventory Details tab in the Analysis Workbench, select the inventory item for whose component version you want to identify the user-preferred license.
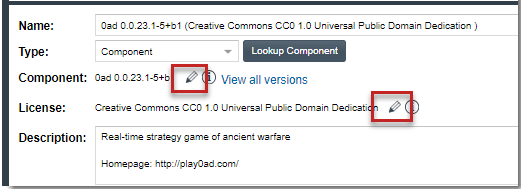
| 2. | Click the Edit icon next to the Component or License value. |

The Edit Version/License window is displayed.
| 3. | From the License dropdown, select the license that you want to identify as the user-preferred license. Be sure that you select the license from an appropriate license category on the dropdown, as described in License Selections Allowing Access to the “Update License Mapping” Window to ensure that Update License Mapping window will be opened. |
Alternatively, click New to create a custom license to map to the component version. Once you have defined the license on the Create Custom License window, click OK to return to the Edit Version/License window.
| 4. | Click OK on the Edit Version/License window. |
The Update License Mapping window is displayed. Its contents explain what happens if you accept this license mapping for all future inventory automatically created for the component version. For more information about the window contents, see About the Update License Mapping Window.
| 5. | Choose the appropriate option: |
| • | Yes—All future inventory items that the system generates for the component version across projects are automatically mapped to the license you selected. For more information about what happens when you set up a user-preferred license, see After You Save the License Mapping. |
You are returned to the Edit Version/License window.
| • | No—This component-version-license combination is saved for the specific inventory in the database and made available in the Versions for <component> window. However, any future system-generated inventory for this component version will be mapped to the license associated with this version in Code Insight Data Library. |
You are returned to the Edit Version/License window.
| • | Cancel—Return to the Edit Version/License window. |
| 6. | Click Save to save the edits. |
When Registering or Editing Instances in the Lookup Component Feature
You can access the Update License Mapping window when registering or editing an instance of the component version and license in Lookup Component. This process described next is performed within the context of editing an inventory item.
To access the Update License Mapping window by editing the inventory item, do the following:
| 1. | In the Inventory Items list in Project Inventory, select the inventory item associated with the component version for which you want to identify the user-preferred license, and then click the Edit Item button to open the Edit Inventory window. |
Or
In the Inventory Items list in the Analysis Workbench, select the inventory item associated with the component version for which you want to identify the user-preferred license. The details tab for the inventory item is displayed.
Or
At the top of the Inventory Items list in either location, click Add Item (in Project Inventory) or Add New (in Analysis Workbench) to create an inventory item. In the New Inventory window or tab that is displayed, you must select Component in the Type field for the new inventory item.
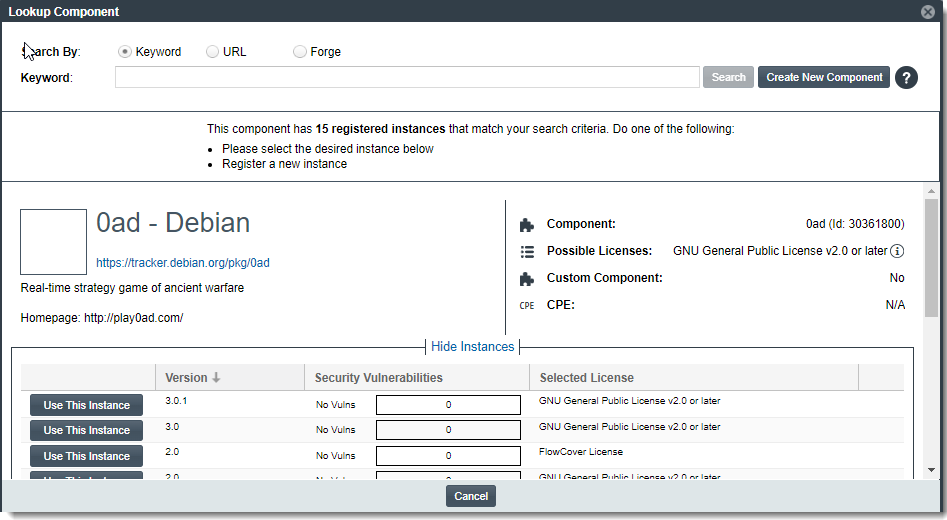
| 2. | Click the Lookup Component button to open the Lookup Component window. |
| • | For an inventory item you are editing, the page for the component associated with the inventory item is automatically displayed in the Lookup Component window. |
| • | For an item you are creating, use the Lookup Component window to search for and locate the component to associate with the item (or create a new component). |
| 3. | On the Lookup Component window, click Show Versions to display a grid showing registered instances of component versions and their mapped licenses for the component. |

| 4. | Locate the component version instance for which you are setting up the license. |
Or
Click Register a New Instance to select or create a new component version.
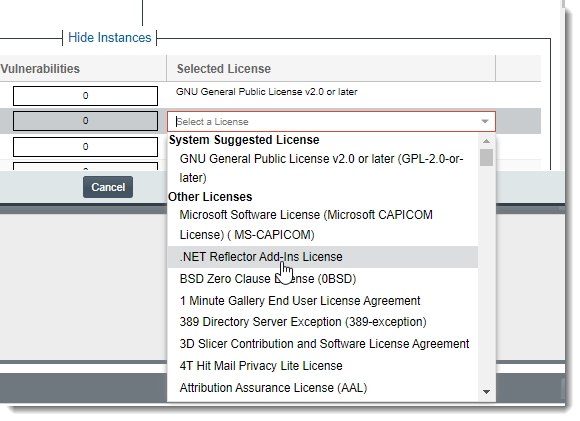
| 5. | Click within the license field for the instance. |
| 6. | From the License dropdown, select the license that you want to identify as the user-preferred license. You must select the license from an appropriate license category on the dropdown, as described in License Selections Allowing Access to the “Update License Mapping” Window, to ensure that Update License Mapping window is opened. |

The Update License Mapping window is displayed. Its contents explain what happens if you accept this license mapping for all future inventory automatically created for the component version. For more information about the window contents, see About the Update License Mapping Window.
| 7. | Choose the appropriate option: |
| • | Yes—All future inventory items that the system generates for the component version across projects are automatically mapped to the license you selected. For more information about what happens when you set up a user-preferred license, see After You Save the License Mapping. |
You are returned to the Lookup Component window.
| • | No—This component-version-license combination will be saved for the specific inventory item in the database and made available in Lookup Component window (as a registered instance) and in the Versions for <component> window. However, any future system-generated inventory for this component version will be mapped to the license associated with this version in Code Insight Data Library. |
You are returned to the Lookup Component window.
Cancel—You are returned to the Lookup Component window.
| 8. | Select Use This Instance next to the instance to apply the updated instance to inventory. |
You are returned to the Edit Inventory or New Inventory tab or window.
| 9. | Click Save. |
When Creating a Custom Component Version
You can access the Update License Mapping window when creating a custom component version. For instructions, see Creating Custom Component Versions.