Automated Analysis Tab
FlexNet Code Insight 6.13.2
To control which automated analysis techniques are executed after the scan completes, perform the following steps. (Refer to Automated Analysis for more details about these techniques.)
To configure workspace settings on the Automated Analysis tab, do the following:
|
1.
|
To navigate to the Automated Analysis tab, select My Projects > project_name > Workspaces>workspace_name>Workspace Resources>Edit Workspace Settings. |
|
2.
|
Open the Automated Analysis tab: |
|
3.
|
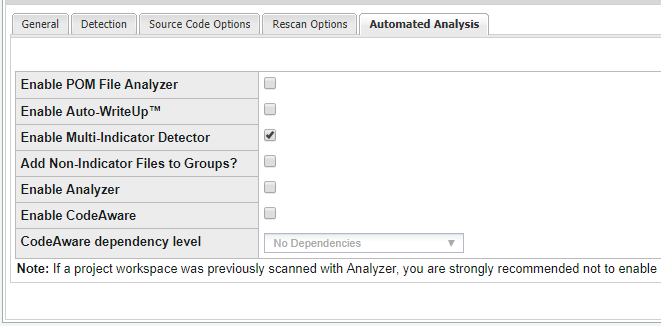
Select any of the following options for the automated analysis of the scan results for a workspace: |
|
•
|
Enable POM File Analyzer—This automatically creates a group for the artifact for which the POM file exists, as well as for each dependency that is defined in the POM file. The dependency groups also contain the group id of the parent group in the new parentIds field. This data can be used to generate a hierarchical relationship between the top-level projects and their transitive dependencies. This analysis technique is disabled by default. |
|
•
|
Enable Auto-WriteUp™—This automatically creates a group with associated files and populates it with group details such as Description, URL and As-Found License Text if all rule engine conditions are satisfied. For detailed information on this option, see Using Auto-WriteUp™. This analysis technique is enabled by default. |
|
•
|
Enable Multi-Indicator Detector (MID)—This automatically creates a group with associated files if all MID rule conditions are satisfied. This analysis technique is enabled by default. |
|
•
|
Add Non-Indicator Files to Groups—For each system group that is created, the indicator files (files that are indicators of the group and the reason the group exists) are always added to the group. However, you can also optionally have the system add all other files known to exist in the component (and version if available) associated with the group. In other words, any scanned file that has exact matches to the component (and version if available) can be added as an included file to the system created group. This option is disabled by default. |
|
•
|
Enable Analyzer—The Analyzer aids the auditing of third-party code by automatically identifying dependencies, packages, and source distributions. The Analyzer works in two ways. First, it can be used before a scan task to generate a Quick Assessment report that provides an overview of your codebase contents. Secondly, the Analyzer can execute automatically (or be scheduled to execute) after a scan to create component groups or inventory items. It also builds Third-Party Notices for groups and inventory items when the data is available and, for scheduled executions, produces a Group Builder report. Refer to Using the Analyzer to for details. |
|
•
|
Enable CodeAware—CodeAware is basically the “next generation” of automated discovery, providing much of the same detection functionality as the Analyzer to build groups and auto-generate inventory. |
Note • If a workspace was previously scanned with the Analyzer, you are strongly recommended not to enable CodeAware in place of the Analyzer for subsequent scans, as this can result in duplicate groups. If you would like to replace Analyzer results with CodeAware results, you can do so in a new project to avoid duplicates.
|
•
|
CodeAware dependency level—If Enable CodeAware is selected, you can specify the level of dependencies you want CodeAware to process: |
|
•
|
Only First Level Dependencies—Direct (first-level) dependencies only. |
|
•
|
All Transitive Dependencies—Both direct and transitive dependencies. Transitive dependencies are basically dependencies of dependencies. |
|
•
|
No Dependencies—No dependency processing at all. (Default) |
Open topic with navigation