Configuring and Editing Your Project
Code Insight 6.14.2
General project information contains the following items:
|
•
|
Enable Inventory Quick Review |
|
•
|
Auto-Publish System-Detected Inventory |
|
•
|
Apply Policies to Inventory |
|
•
|
Review levels (along with any conditions required to enable them, by default, all review levels are always enabled) |
To edit, delete, or add information to a project, do as follows:
|
1.
|
Log in to Code Insight as an Owner. |
|
2.
|
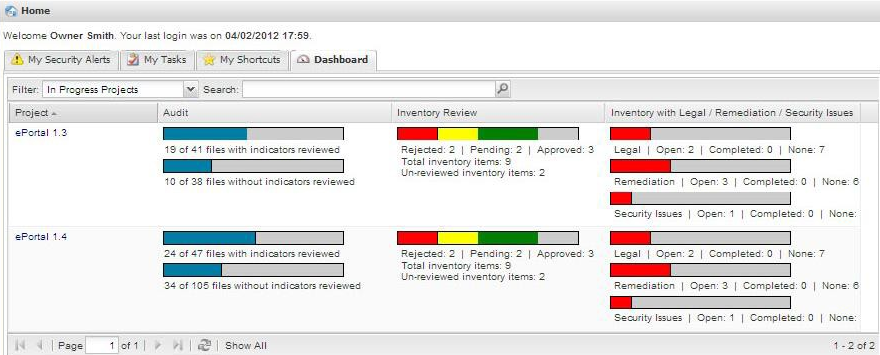
Click Home in the Main menu bar. The Home page appears: |
|
3.
|
On the top left of the page, click the My Projects button to open the My Projects page, which lists all projects: |

|
4.
|
Click the project name. The Project Summary page appears: |
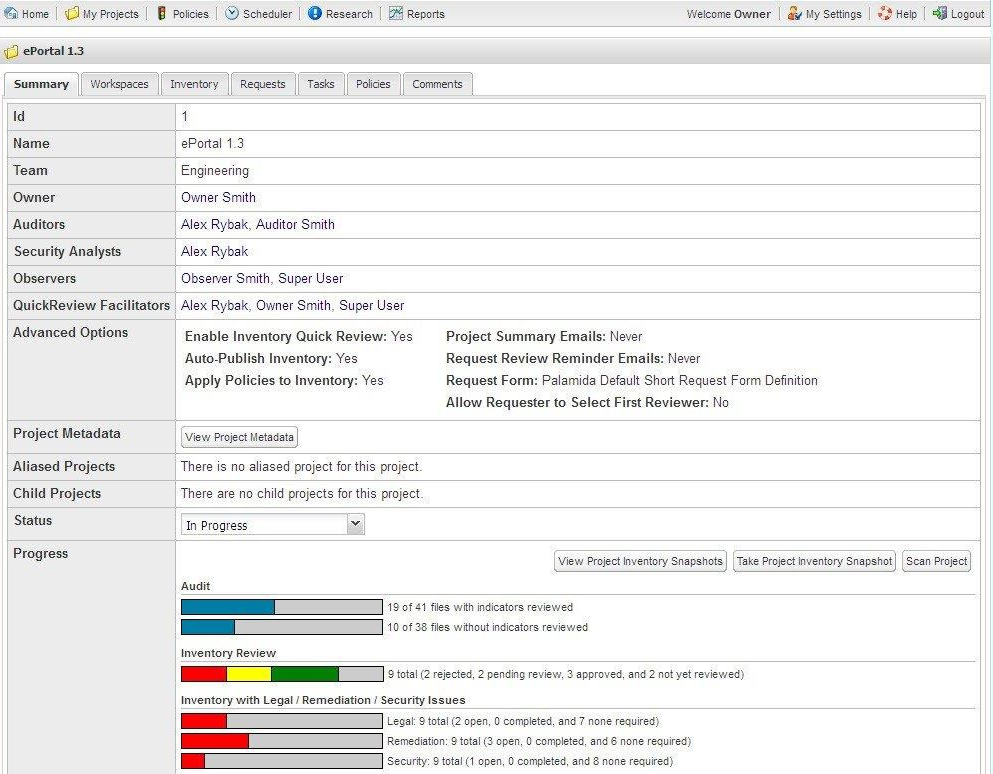
On the Summary tab you can view and scan the project using the buttons in the Progress section:
|
5.
|
Click the Back button to return to the My Projects page. |
|
6.
|
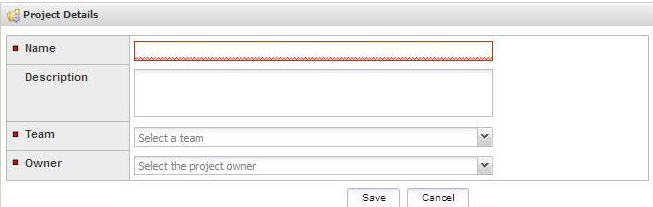
Click the Pencil and Paper icon to the right of the project you want to edit. The Project Details page appears: |
|
7.
|
For each project, you can edit general project information, as well as the lists of users associated with each project: |
|
•
|
Observers: read-only view of project data |
|
•
|
QuickReview™ Facilitators: approve/reject inventory items |
|
•
|
Auditors: launch Detector to review scan results and conduct audit |
|
•
|
Security Analysts: review vulnerabilities associated with inventory items |
|
•
|
Requesters: submit request for use of OSS/TP software |
|
•
|
Reviewers: review requests |
|
8.
|
Enter text in the Name and Description fields. |
Note:The selected Team is not editable via the Edit Project page. Only an application administrator can change the team to which the project is assigned via the Administrator à Projects à Project Details page.
|
9.
|
Select the Owner and Project Summary Email Frequency using the pull-down menu. |
|
10.
|
Choose the Request Review Reminder email delivery frequencies from the pull-down menu. |
|
11.
|
Select either a long or short request form type via the pull-down menu. |
|
12.
|
(Optional) Check the Advanced Options checkboxes: |
|
•
|
Enable Inventory Quick Review: allows an Approve/Reject inventory option for the project owner on the Inventory Details page. If either of these options is selected, then the request workflow is not required. |
|
•
|
Auto-Publish System-Detected Inventory: automatically publishes any system-detected groups from Detector as inventory. |
|
•
|
Apply Policies to Inventory: applies any always approve/reject policies to published inventory and sets the Review Status to Approved or Rejected if a matching policy exists. All other inventory items receive a Review Status of Ready for Review. |
|
13.
|
Add or delete Review Levels and Child Projects in the associated fields if you wish. To add a review level, for example, if you want to differentiate between specific technical review levels in a software development project, click on the Add A Review Level Plus icon. This opens a text field into which you can enter a name of your choosing for the new review level. This also adds a new tab to the Project Details page on which you must select both the appropriate reviewers for a given level, and optionally define the conditions to activate this level if it should not always be active. By default, all review levels are created as enabled, but levels may be changed to conditionally enabled if desired. |
|
14.
|
Click Alias Project to search aliased projects. |
|
15.
|
To edit the name of a review level, click the Pencil and Paper icon associated with that particular review level. |
|
16.
|
To delete a review level, click the X. |
|
17.
|
To add the name of a Child Project, click on the green Plus icon. |
|
18.
|
To edit or delete a child project, click on Pencil and Paper icon to edit or the X icon to delete. |
|
19.
|
Select a Scan Server from the pull-down menu. This feature allows all workspaces to reside on one server. |
|
20.
|
To select a Scan Root Path, click Browse, Type, or Remove. |
|
21.
|
Click Save to save your work. |