InstallAnywhere 2020
This section describes possible upgrade issues that may occur when you upgrade projects that were created with earlier versions of InstallAnywhere. It also alerts you to possible changes in behavior that you may notice between InstallAnywhere 2020 projects and projects that are upgraded from an earlier version to InstallAnywhere 2020.
| • | Converting Projects to InstallAnywhere 2020 |
| • | Upgrading from InstallAnywhere 2014 or Earlier |
| • | Upgrading from InstallAnywhere 2013 or Earlier |
| • | Upgrading from InstallAnywhere 2012 or Earlier |
| • | Upgrading from InstallAnywhere 2010 or Earlier |
| • | Upgrading from InstallAnywhere 2009 or Earlier |
| • | Upgrading from InstallShield MultiPlatform |
Converting Projects to InstallAnywhere 2020
When you open a project that was created with a previous version of InstallAnywhere, you will be prompted to convert it to 2020 format.
To convert an existing project to InstallAnywhere 2020 format:
| 1. | Launch InstallAnywhere. The InstallAnywhere Create/Open Project dialog box opens. |
| 2. | Click the Open existing project button. The Open Project File dialog box opens. |
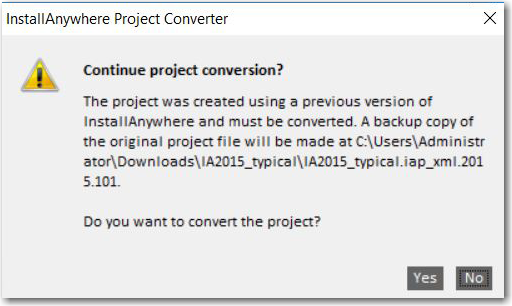
| 3. | Locate and select the project file that you want to open and click the Open button. The following dialog box opens informing you that the project is going to be converted, and that a backup copy will automatically be created. |
| 4. | Click Yes. If the InstallAnywhere project accepts VMs prior to 1.6, the following message will be displayed stating that proceeding with JRE conversion will update the valid VM list to require Java 6.1 or later. |
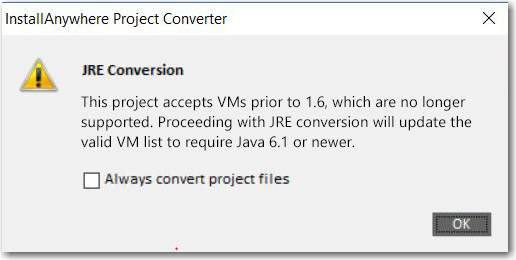
| 5. | Click OK. The project conversion is completed. |
Upgrading from InstallAnywhere 2014 or Earlier
Database Server Support for Microsoft SQL Server and IBM DB2
If you have an InstallAnywhere 2014 or earlier project that contains a Microsoft SQL Server or IBM DB2 or database server host and you open the project in InstallAnywhere 2020, InstallAnywhere displays a warning and informs you that may need to make changes to incorporate the new run-time panel action that lets end users specify connection information. To learn more, see Enabling End Users to Specify Database Connection Information.
InstallAnywhere no longer has support for the following versions of Microsoft SQL Server:
| • | Microsoft SQL Server 6.5 |
| • | Microsoft SQL Server 7.0 |
| • | Microsoft SQL Server 2000 |
| • | Microsoft SQL Server 2005 |
InstallAnywhere supports Microsoft SQL Server 2008 R2, 2012, and 2014 databases.
Removal of InstallAnywhere Collaboration Support
All support for the InstallAnywhere Collaboration plug-in and DIM references has been removed from InstallAnywhere. That is, the DIM References view and the DIM-related actions (the Create DIM Reference action and the Create Alias, Link, Shortcut to DIM File action) are no longer be available in InstallAnywhere. It will no longer be possible to build installers that reference DIM files. If you upgrade a project that contains DIM references or DIM actions from InstallAnywhere 2014 or earlier to InstallAnywhere 2020, InstallAnywhere 2020 removes them from your project.
It is recommended that before upgrading a project with DIM support to InstallAnywhere 2020, all DIM references and DIM-related actions be removed from InstallAnywhere projects and replaced with standard files and actions where appropriate.
Upgrading from InstallAnywhere 2013 or Earlier
Changes in macOS and OS X Version Requirements for Target Systems
Apple made full authentication support available starting with OS X 10.8. The authentication support that Apple provided in OS X 10.7 was limited and is no longer recommended on OS X 10.7–based systems. If you specify in your InstallAnywhere project that your macOS or OS X–based installer requires administrator credentials (Project page > Platforms view > Mac OS X area > Authentication), the installer and corresponding uninstaller that InstallAnywhere builds cannot be run on OS X 10.7–based systems. On OS X 10.8 and later systems including macOS 10.12, root users and administrator users can run the installer; standard users need to enter administrator credentials before the installer can continue running.
Apple no longer supports OS X 10.6 and earlier. Therefore, InstallAnywhere no longer supports the creation of installers for OS X 10.6 or earlier. If end users have OS X 10.6 on their machine and they try to run an installer that was built with InstallAnywhere 2020, the installer may run successfully, or unexpected results may occur.
Changes to the List of Supported macOS and OS X Versions for Running InstallAnywhere
InstallAnywhere now supports the macOS Sierra (10.12) for running installer run-time environment, as well as for the InstallAnywhere authoring environment. The minimum version of OS X that is required for OS X–based systems that run InstallAnywhere (the authoring environment) is now OS X 10.7.5 with Oracle Java 7.
Changes to the List of Supported Windows Versions for Running InstallAnywhere
The minimum version of Windows that is required for Windows-based systems that run InstallAnywhere (the authoring environment) is now Windows Vista or Windows Server 2008 (x86 and x64). Previously, the minimum Windows requirement was Windows XP.
New Requirement for Using Project Automation APIs with Node-Locked Licenses of InstallAnywhere
If you are using a node-locked license of InstallAnywhere, the licensing libraries must be loaded while using the project automation API. This is typically done by configuring an IDE setting or by passing the following parameter through the command line when running the Java class:
-Djava.library.path=IA_HOME\resource\fnp\libraries
If the library path includes spaces, ensure that you enclose the library path within quotes:
-Djava.library.path="IA_HOME\resource\fnp\libraries"
Discontinuation of the InstallAnywhere Collaboration Tool; Deprecation of InstallAnywhere Collaboration Support
The InstallAnywhere Collaboration plug-in for Eclipse has been discontinued. This tool is not available for installation when you install InstallAnywhere 2020, and a separate installer that installs only InstallAnywhere Collaboration is not available.
If you have developer installation manifest (DIM) files that were created in an earlier release of InstallAnywhere Collaboration, you can add them to InstallAnywhere 2014 projects. However, support for DIM files in InstallAnywhere 2014 has been deprecated and is no longer supported. In a future release, all support for DIM files will be removed from InstallAnywhere. That is, the DIM References view and the DIM-related actions will no longer be available, and it will no longer be possible to build installers that reference DIM files.
It is recommended that all DIM references and DIM-related actions be removed from InstallAnywhere projects and replaced with standard files and actions where appropriate.
macOS and OS X Build Targets and Java Virtual Machine Searches
If you have a macOS or OS X build target in your project and its Without VM check box is selected in the Build Installers view on the Build page, the installer searches for Oracle JRE 7 or later on target systems; if it is not present, the installation exits. The Without VM check box no longer has an option to search for Apple JRE 6 or earlier. This applies to all new projects that are created in InstallAnywhere 2020. It also applies to all projects that were created in InstallAnywhere 2013 or earlier and upgraded to InstallAnywhere 2020.
Database Server Support for MySQL, Firebird, Interbase, and Sybase ASE
If you have an InstallAnywhere 2013 or earlier project that contains a MySQL database server host and you open the project in InstallAnywhere 2020, InstallAnywhere displays a warning and informs you that may need to make changes to incorporate the new run-time panel action that lets end users specify connection information. To learn more, see Enabling End Users to Specify Database Connection Information.
InstallAnywhere no longer has support for the following versions of MySQL:
| • | MySQL 4.1 |
| • | MySQL 5.0 |
InstallAnywhere supports MySQL 5.1.29, as well as MySQL 5.5 and 5.6.
InstallAnywhere no longer has support for connecting to the following database servers and running SQL scripts:
| • | Firebird |
| • | Interbase |
| • | Sybase ASE |
If you have an InstallAnywhere 2013 or earlier project that contains a host that is configured to be one of those server types and you open the project in InstallAnywhere 2020, InstallAnywhere displays a warning and changes the server type of that host to the default type, which is MySQL. You can change the server type to one of the other supported types as needed.
To learn more, see Managing Database Servers.
Application Server Support for Tomcat, Resin, and Sun Application Server
If you have an InstallAnywhere 2013 or earlier project that contains a Tomcat application server host and you open the project in InstallAnywhere 2020, InstallAnywhere displays a warning and informs you that may need to make changes to incorporate the new run-time panel action that lets end users specify connection information. To learn more, see Enabling End Users to Specify Apache Tomcat Server Information.
In addition, InstallAnywhere no longer has support for the following versions of Tomcat:
| • | Tomcat 5.0 |
| • | Tomcat 5.5 |
If you have an InstallAnywhere 2013 or earlier project that contains a host with a server type of Tomcat 5.0, 5.5, and 6.0 and you open the project in InstallAnywhere 2020, InstallAnywhere changes the server type of that host to Tomcat 6.0.x, 7.0.x & 8.0.
InstallAnywhere no longer has support for deploying Web applications to the following application servers:
| • | Resin |
| • | Sun Application Server |
If you have an InstallAnywhere 2013 or earlier project that contains a host that is configured to be one of those server types and you open the project in InstallAnywhere 2020, InstallAnywhere displays a warning and changes the server type of that host to Tomcat 6.0.x, 7.0.x & 8.0. You can change the server type to one of the other supported types as needed.
To learn more, see Managing Application Servers.
Upgrading from InstallAnywhere 2012 or Earlier
New Build Target for Pure 64-Bit Windows-Based Systems
InstallAnywhere 2020 has support for building installers that target pure 64-bit Windows-based systems on which 32-bit Windows-on-Windows (WOW64) support is disabled.
If you create a new project in InstallAnywhere 2020, it automatically includes a build target for pure 64-bit Windows-based systems by default. If you upgrade an InstallAnywhere 2012 or earlier project to InstallAnywhere 2020, InstallAnywhere automatically adds this build target to your project.
Upgrading from InstallAnywhere 2010 or Earlier
Default Uninstall Behavior for Imported Merge Modules
If you import a merge module into an InstallAnywhere 2020 project, the Uninstall Merge Module when parent is uninstalled check box is selected by default. This check box lets you specify whether you want the merge module to be uninstalled from target systems when the parent project is uninstalled.
If you have an InstallAnywhere 2010 or earlier project that includes one or more imported merge modules, and you upgrade the project to InstallAnywhere 2020, the Uninstall Merge Module when parent is uninstalled check box is cleared by default for those merge modules.
If you want to change the behavior in either case, you can change the state of the check box:
| • | To change the behavior for an individual merge module: On the Sequence tab, click Install. In the Visual Tree, select the merge module whose behavior you want to change. In the Install Merge Module customizer, on the Properties subtab, select or clear the Uninstall Merge Module when parent is uninstalled check box. |
| • | To change the behavior for a dynamic merge module: On the Organization tab, click Modules. In the Imported Merge Module List, select the dynamic merge module whose behavior you want to change. In the Dynamic Merge Module customizer, on the Install tab, select or clear the Uninstall Merge Module when parent is uninstalled check box. |
VM Pack Creation
VM packs that are created using the Create VM Pack utility, which was introduced in InstallAnywhere 2011, can be used only with installers that are created in InstallAnywhere 2011 or later, not with installers that were created in earlier versions of InstallAnywhere (such as InstallAnywhere 2009 or InstallAnywhere 2010). If you want to use VM packs with any older installers (those that were created in InstallAnywhere 2010 or earlier), you must follow the manual process, as described in Creating a JRE VM Pack Manually.
Project Automation APIs and Configuring Behavior for Maintenance Mode and Instance Management
If you are upgrading an InstallAnywhere 2010 (without SP1) project to InstallAnywhere 2020 and you want to use the project automation APIs to modify maintenance mode and instance management in your project, it is recommended that you first open and save your project in the InstallAnywhere 2020 Advanced Designer.
Configuring Build Target Information through the BuildProperties.xml File
If you upgrade an InstallAnywhere 2010 or earlier project to InstallAnywhere 2020 and you were using a BuildProperties.xml file to configure build targets, note that some of the XML code has been changed. In InstallAnywhere 2011 and later, the buildWithVM, BuildWithNoVM, outputDir, and bundledVM settings are attributes of the <target> element. In InstallAnywhere 2010 and earlier, these settings were subelements of the <target> element. Therefore, if you upgrade an InstallAnywhere 2010 or earlier project to InstallAnywhere 2020, ensure that you update your BuildProperties.xml file accordingly.
Configuring Build Target Information through Ant Tasks
If you upgrade an InstallAnywhere 2010 or earlier project to InstallAnywhere 2020 and you were using an Ant task to configure build targets, note that some of the XML code has been changed. In InstallAnywhere 2011 and later, the buildWithVM, BuildWithNoVM, outputDir, and bundledVM settings are attributes of the <target> element. In InstallAnywhere 2010 and earlier, these settings were subelements of the <target> element. Therefore, if you upgrade an InstallAnywhere 2010 or earlier project to InstallAnywhere 2020, ensure that you update your Ant task accordingly.
Upgrading from InstallAnywhere 2009 or Earlier
Change to the Default Name of the Uninstaller Executable File
If you create a project in InstallAnywhere 2020, the default name for the uninstall launcher is Change ProductName Installation.exe.
If you created a project in InstallAnywhere 2009 or earlier, the default name for the uninstall launcher was Uninstall ProductName.exe; if you upgrade the project to InstallAnywhere 2020, InstallAnywhere does not change the name of the uninstaller launcher automatically. You may want to manually change the name. To do so: On the Sequence page, click Install. Then select the uninstall launcher and edit the value in the Name setting on the Properties tab.
Changes for Organizing Build Settings
InstallAnywhere has support for creating and maintaining different build configurations. Each build configuration defines how InstallAnywhere builds an installer for a particular set of platforms, build distributions, JVMs, locales, and other settings. You can store as many build configurations with a project as necessary. When you create a new project in InstallAnywhere 2020, it contains a default build configuration called Default Configuration.
InstallAnywhere 2009 and earlier did not have support for build configurations. If you open an InstallAnywhere 2009 or earlier project in InstallAnywhere 2020, InstallAnywhere displays the Build Settings Conversion Notice message box, which asks you if you want InstallAnywhere to convert the existing build settings automatically to the build configuration model. If you reply that you do want to convert it, InstallAnywhere upgrades all of the project’s existing build settings into a new build configuration called Migrated Configuration. If you want to modify the settings for this build configuration, you can do so. To learn more, see:
| • | Defining Build Targets |
| • | Specifying Build Distribution Options |
| • | Using Tags to Customize Build Configurations |
| • | Specifying Locale Settings |
Changes for Locales
In InstallAnywhere 2009 and earlier, the locales directory in the build output folder was named <project_name>locales. If you are upgrade an InstallAnywhere 2009 or earlier project to InstallAnywhere 2020, you must rename this directory with the following naming convention:
<project_name>locales_<build_configuration_name>
Once you have renamed the folder, rebuild the project in InstallAnywhere 2020.
Changes Related to Rollback Behavior
InstallAnywhere has built-in support for rollback behavior: On the Rollback tab of action customizers in the Install view of the Sequence page, you can specify rollback behavior on a file-by-file basis. You can fine-tune how the installer treats individual project elements during a rollback and can specify which project elements would trigger a rollback if the installation of that element fails.
InstallAnywhere 2009 and earlier did not have built-in support for rollback behavior; these versions included support for custom code that triggered a rollback handler; if an end user cancelled the installation, the rollback handler was called.
If you upgrade a project from InstallAnywhere 2009 or earlier with the rollback handler code to InstallAnywhere 2020, the rollback handler code is launched only if the Enable Rollback check box is cleared; this check box is in the Advanced view on the Project tab. To learn how to use the new built-in rollback behavior, see Configuring Installation Rollback Behavior.
Upgrading from InstallShield MultiPlatform
Changes for Organizing Build Settings
InstallAnywhere has support for creating and maintaining different build configurations. Each build configuration defines how InstallAnywhere builds an installer for a particular set of platforms, build distributions, JVMs, locales, and other settings. You can store as many build configurations with a project as necessary. When you create a new project in InstallAnywhere 2020, it contains a default build configuration called Default Configuration.
If you use a project manifest to upgrade an InstallShield MultiPlatform project to InstallAnywhere 2020, InstallAnywhere creates a new build configuration called Migrated Configuration for the upgraded project. If you want to modify the settings for this build configuration, you can do so. To learn more, see:
| • | Defining Build Targets |
| • | Specifying Build Distribution Options |
| • | Using Tags to Customize Build Configurations |
| • | Specifying Locale Settings |
InstallAnywhere 2020 Help LibraryOctober 2019 |
Copyright Information | Flexera |