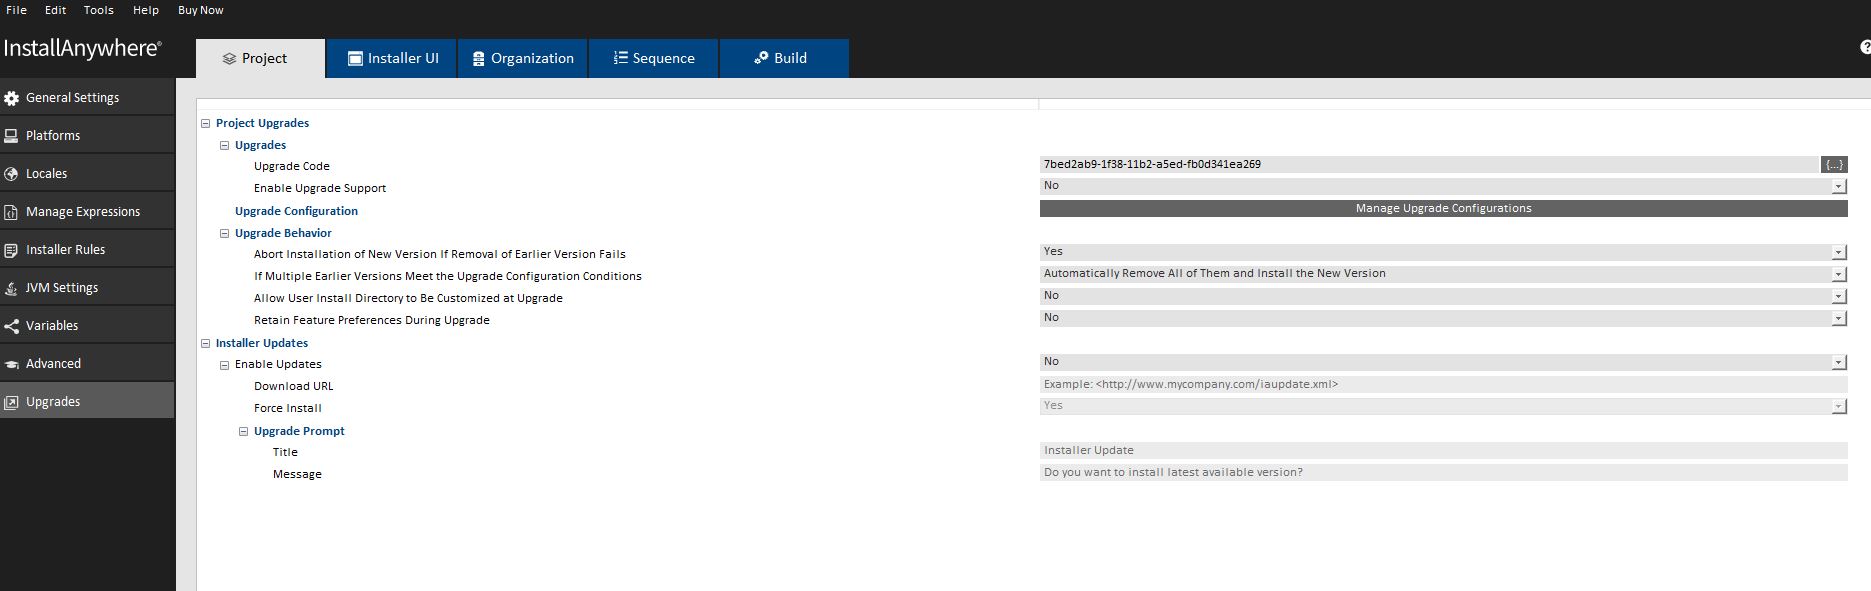
Upgrades View
InstallAnywhere 2021 » Advanced Designer » Project
Use the Upgrades view on the Project page to configure settings for creation of an upgrade installer that uninstalls earlier versions of your product—if they are present—before installing the new version.
The settings in the Upgrades view are organized into the following areas:
| • | Upgrades |
| • | Upgrade Configuration |
| • | Upgrade Behavior |
Use the Upgrades area in the Upgrades view to specify whether you want to include upgrade support in your installers. This area also shows the upgrade code of the project.
|
Control |
Description |
|
Upgrade Code |
Enter a GUID that uniquely identifies a product family. In order to include upgrade support, the upgrade code should be consistent across different versions and languages of a family of related products. To have InstallAnywhere generate a different GUID for you, click the Generate Upgrade Code button ({...}) in this setting. The GUID must be in the format that is displayed. At run time, the installer writes the upgrade code in the InstallAnywhere registry, regardless of whether upgrade support is enabled. |
|
Enable Upgrade Support |
Specify whether you want to create installers that have support for upgrading earlier versions of your product that are present on target systems before installing the new version. If upgrade support is not enabled, the installer does not check target systems at run time to verify whether an earlier version of the product needs to be uninstalled before installing the new version. The default value is No. For background information on requirements for including upgrade support, see Requirements for Upgrade Support. |
Use the Upgrade Configuration area in the Upgrades view to define information about the earlier versions of your product that you want to be able to upgrade with installers that are built out of the current project. When you click the Manage Upgrade Configurations button in this area, the Manage Upgrade Configurations dialog box opens. To learn more, see Manage Upgrade Configurations Dialog Box.
Use the Upgrade Behaviors area in the Upgrades view to configure details about the upgrade that you are creating in the current project.
|
Control |
Description |
|||||||||||||||
|
Abort Installation of New Version If Removal of Earlier Version Fails |
Indicate whether you want to avoid installing the new version of the product if an earlier version of the product was detected on the target system but it could not be successfully removed. Available options are:
|
|||||||||||||||
|
If Multiple Earlier Versions Meet the Upgrade Configuration Conditions |
Select the behavior that you want to occur if multiple earlier versions of the product are detected to be present on the target system—that is, if multiple earlier versions of the product meet the upgrade configuration conditions that are configured in the Upgrade Configuration area in the Upgrades view. Available options are:
If the end user selects an existing instance, that instance is silently removed from the target system, and then a single instance of the new version is installed. If the installer is running silently, the first instance that the installer finds in the InstallAnywhere registry is removed. |
|||||||||||||||
|
Allow User Install Directory to Be Customized at Upgrade |
Indicate whether you want end users to be able to specify a new location for the new version that the upgrade is installing. Available options are:
|
|||||||||||||||
|
Retain Feature Preferences During Upgrade |
Indicate whether you want end users’ feature preferences for the earlier version of the product to be retained for the new version that the upgrade is installing. Available options are:
The Yes option may be useful if the feature tree does not change significantly between the earlier version and the new version.
|
Installer Updates
In InstallAnywhere 2018 SP1, you can now enable and configure a software downloadable update. The end user can either download a newer version or skip and proceed with the current installation process. A new Installer Updates option has been added to the Upgrades menu where you can specify these downloadable update settings.
Requirements and Recommendations
The requirements and recommendations for supporting the Downloadable Updates are given below:
| 1. | The URL for hosting a metadata file should be called iaupdate.xml file. |
| 2. | The URL for hosting the update installer setup, should be same as iaupdate.xml location. |
| 3. | During the build time, InstallAnywhere creates iaupdate.xml file and places it under the project’s build folder inside UpdateMetadata subfolder. The iaupdate.xml file identifies the different versions of installer and their downloaded locations. You can update this file manually as required before uploading to the website. |
| 4. | While releasing an update, upload the iaupdate.xml file and update the installer setup to your website. |
| 5. | The iaupdate.xml file contains the URL for updated installer setup, which by default is same as iaupdate.xml host URL and can be changed as required. |
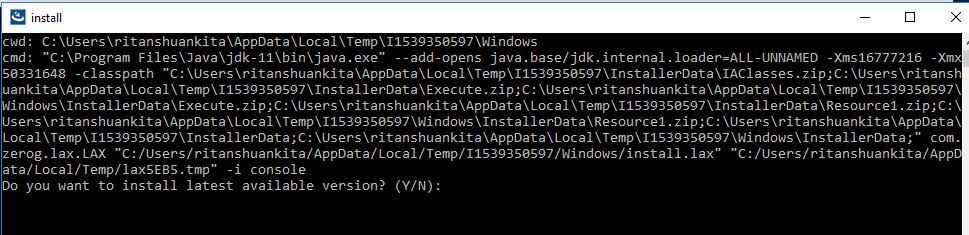
Note:GUI and Console mode of installation are support Installer Update. Silent mode will proceed with the current installation.
|
Control |
Description |
|||||||||||||||
|
Enable Updates |
You can now enable updates for the end users to see the downloadable update support. To enable updates, select the Enable Updates option on the Installer Updates tab of the Upgrades menu. To Enable Downloadable Update Support for a Base Project:
|
|||||||||||||||
|
Download Url |
You can now enter the download URL (iaupdate.xml) in the Download URL field on the Enable Updates option on the Installer Updates tab of the Upgrades menu. Yo can enter the absolute path URL (starting with either http:// or https:/ or ftp://) on the Installer Updates option in the Download URL. The iaupdate.xml file needs to be uploaded to the same path that you specify in the Download URL setting. |
|||||||||||||||
|
Force Install |
To Force Install:
Note:You can override the location of the setup launcher that you specify in the Download URL setting by specifying the appropriate path in the iaaupdate.xml file. |
|||||||||||||||
|
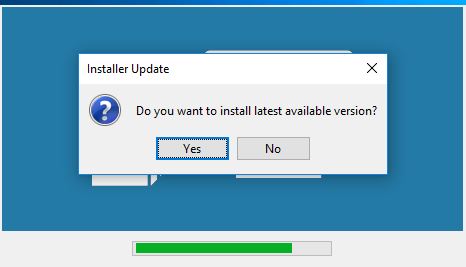
Prompt Message |
You can now customize the message and provide a title for the message that is displayed during the installation to prompt the end users. Note:This setting is enabled only when the Force Install is set as ‘No’. The default value for the Title is ‘Installer Update’ and the Message is displayed as ‘Do you want to install latest available version?’ During the installation, if the update is available; The end users will see a prompt dialog to download a newer version. The user can select ‘Yes’ and proceed with updated installation or select ‘No’ to skip and proceed with the current installation. |

|
Control |
Description |
|
Title |
You can now specify the title of the Upgrade Prompt message for the end users. |
|
Message |
You can enter the customized message in the Message field on the Upgrade Prompt option on the Installer Updates tab of the Upgrades menu. You can either create a new message or select a message from the localized available list of strings. Note:If the Force Install is set as ‘Yes’, the updates are automatically downloaded and no prompt will be available. |
To Prepare Setup Launcher:
To prepare an update setup launcher for a project:
| 1. | Click and open InstallAnywhere project. |
| 2. | Configure Installer Updates setting. |
| 3. | Download URL field is mandatory and should point to iaupdate.xml - http://MyWebSite.com/path/iaupdate.xml. |
| 4. | Configure Force Install and Upgrade Prompt option as necessary or default values will be set |
| 5. | Build the project. |
InstallAnywhere creates the iaupdate.xml file and places it under project’s build folder inside UpdateMetadata subfolder
The XML file contains elements as following:
| • | Update Id: Id is same as Product ID which helps base installer to identify corresponding latest version |
| • | Version: Identifies latest version |
| • | Target OS: Identifies latest update is available for specific Operating System |
| • | URL: Installer update latest version location |
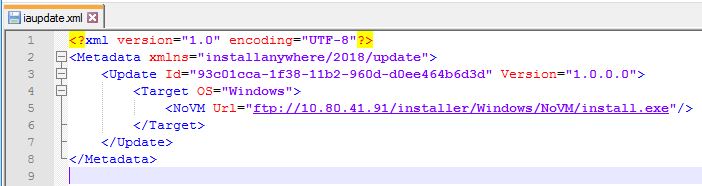
Example for iaupdate.xml content.
You can edit the file as required before uploading to your site.
For example, if you want to change the path of the updated installer, you can change the value of the URL attribute and then re-upload the iaupdate.xml file to the designated location.
If you are interested in using the same iaupdate.xml file to define the upgrades for multiple products, you can add multiple
Update element for each of your products to the file.
| 6. | Upload the iaupdate.xml file and the update installer setup to site. |
To Run-Time Behavior for Downloadable Updates:
| 1. | When the Force Install setting is set as Yes: |
| • | The iaupdate.xml file is present and it references to a newer version of the installation that is available in the specified path; And the base setup downloads and launches automatically. |
| 2. | When the Force Install setting is set as No: |
| • | The iaupdate.xml file is present and it references to a newer version of the installation that is available in the specified path; And the base setup displays Prompt as Follows. |
| • | Yes: Downloads and launches update installer setup |
| • | No: Proceed with base setup installation |
| 3. | If the iaupdate.xml file does not include a reference to a newer version of the installation, or if the iaupdate.xml file is not present, the installation of base setup proceeds. |
| 4. | If the iaupdate.xml file is present and it references a newer version of the installation that is not available in the specified path, the installation of base setup proceeds. |
See Also