What’s New in InstallAnywhere 2018
For information about new features and enhancements added in InstallAnywhere 2018, refer to the following sections:
| • | Perform Open Source Risk Assessment and Vulnerability Scan with FlexNet Code Aware |
| • | All InstallAnywhere Features Now in a Single Edition |
| • | Redesigned InstallAnywhere Advanced Designer User Interface |
| • | Enhanced Upgrade Installers Now Accommodate Maintenance Mode and Instance Management |
| • | Support for Java 9 |
| • | Ability to Customize the Windows File Properties of an Installer Executable File for a Windows Build Target |
| • | Ability to Customize the Get Info Property Value for Copyright Field for an OS X / macOS Build Target |
| • | Ability to Add Checkbox to Install Complete Panel to Launch Target Application or README File |
| • | Option to Disable Logging Upon User Cancellation During Pre-Install Sequence |
| • | Execute Script/Batch File Action Run in Console Mode Now Writes Action Type and Identifier to Console |
| • | In Console Mode, User Can Now Move Forward Without Scrolling Through the Entire License Agreement |
| • | Ability to Set Compiler Flags, Such as SafeSEH, for Executables Installed on Windows |
| • | ANT Version Associated with Execute ANT Script Action Updated to ANT 1.9.9 |
| • | New Compare Versions Rule |
| • | Expand/Collapse Buttons on Sequence Page Views |
| • | Get Password Action Console Panel Now Available in Pre‑Uninstall and Post-Uninstall Phases |
| • | New User-Defined Range of Installer Exit Codes |
| • | New Variable to Store Response File Location |
| • | Launching Build from User Interface Now Leaves Current Project Unchanged |
Perform Open Source Risk Assessment and Vulnerability Scan with FlexNet Code Aware
There is an increasing need to understand the licensing obligations of all open source software components being bundled with a software application. At the same time, users are getting increasingly worried about the vulnerabilities that these open source components bring in. With InstallAnywhere’s new FlexNet Code Aware scanning feature, users will get the insight into the licensing obligations and vulnerabilities associated with all open source components.
InstallAnywhere now includes full integration with FlexNet Code Aware, an automated open source risk assessment and package discovery solution that enables you to quickly scan your products for security and intellectual property (IP) compliance risk.
| • | Supported File Types |
| • | Running FlexNet Code Aware from Within InstallAnywhere |
| • | Running FlexNet Code Aware as a Standalone Product |
| • | Reading the FlexNet Code Aware Report |
| • | More Information |
Note:FlexNet Code Aware is automatically activated when you activate InstallAnywhere. However, the FlexNet Code Aware license expires one year from the date that it is first launched.
Important:FlexNet Code Aware is not supported on 32-bit machines. A 64-bit operating system is required.
FlexNet Code Aware supports analysis of the following files:
| • | Java Packages |
| • | Node Packages |
| • | Nuget Packages |
| • | RPM Packages |
| • | Ruby Packages |
| • | EXE & DLL Files |
Security vulnerabilities are looked up against the National Vulnerability Database (NVD).
Running FlexNet Code Aware from Within InstallAnywhere
To run FlexNet Code Aware from within InstallAnywhere, click Run FlexNet Code Aware Analysis on the InstallAnywhere Tools menu.
When FlexNet Code Aware completes the scan of your project, the Results Summary view opens, displaying the number of files scanned, and the number of open-source packages and vulnerabilities found.
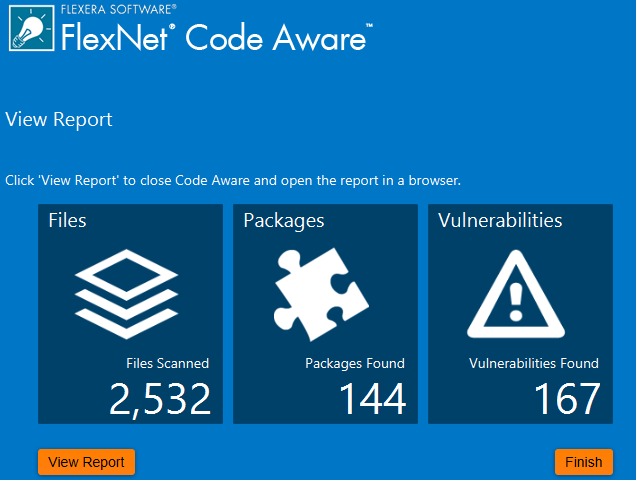
FlexNet Code Aware Results Summary
When you click the View Report button, a full report is displayed.
Running FlexNet Code Aware as a Standalone Product
Rather than scanning the files in the open InstallAnywhere project, you can also launch FlexNet Code Aware as a standalone product and select a directory of files to scan.
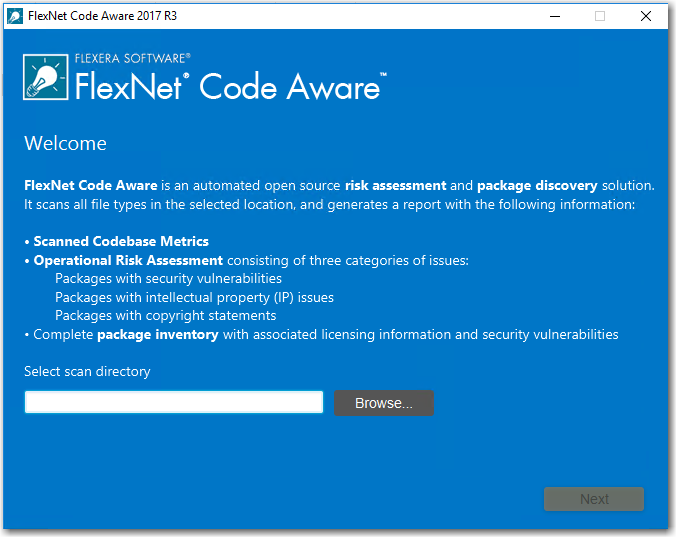
FlexNet Code Aware Welcome Panel
Just click Browse, select the directory that you want to scan, and then analysis will begin.
Reading the FlexNet Code Aware Report
When you click View Report on the Results Summary screen, the full FlexNet Code Aware report opens, consisting of an Initial Summary view and a Package Inventory view.
Initial Summary View
The Initial Summary view presents the user with a scan summary, and assessments of operational risk, security vulnerability exposure, and license exposure.
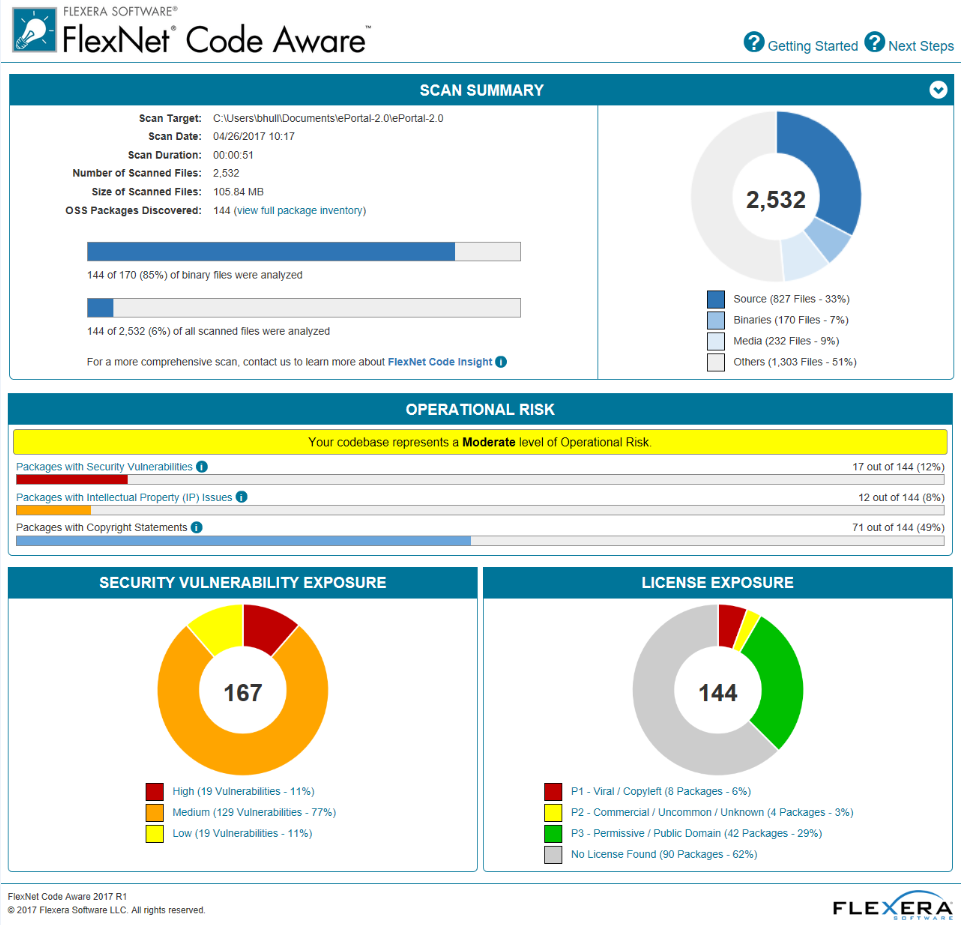
FlexNet Code Aware Initial Summary View
The FlexNet Code Aware Initial Summary View displays the following information:
| • | Scan Summary—This section provides details regarding the codebase that was scanned, including a breakdown of file types, percent of files analyzed, and number of findings. |
| • | Operational Risk—This section provides a composite risk rating based on the combination of packages with Intellectual Property (IP) issues and packages with Security Vulnerabilities. |
| • | Security Vulnerability Exposure and License Exposure—These sections provide a breakdown of the types and categories of identified issues. |
Package Inventory View
The Package Inventory view, available by clicking View full package inventory in the Scan Summary section, provides a complete list of discovered open source and third-party packages with associated licenses, security vulnerabilities, dependencies, and detected copyright statements.
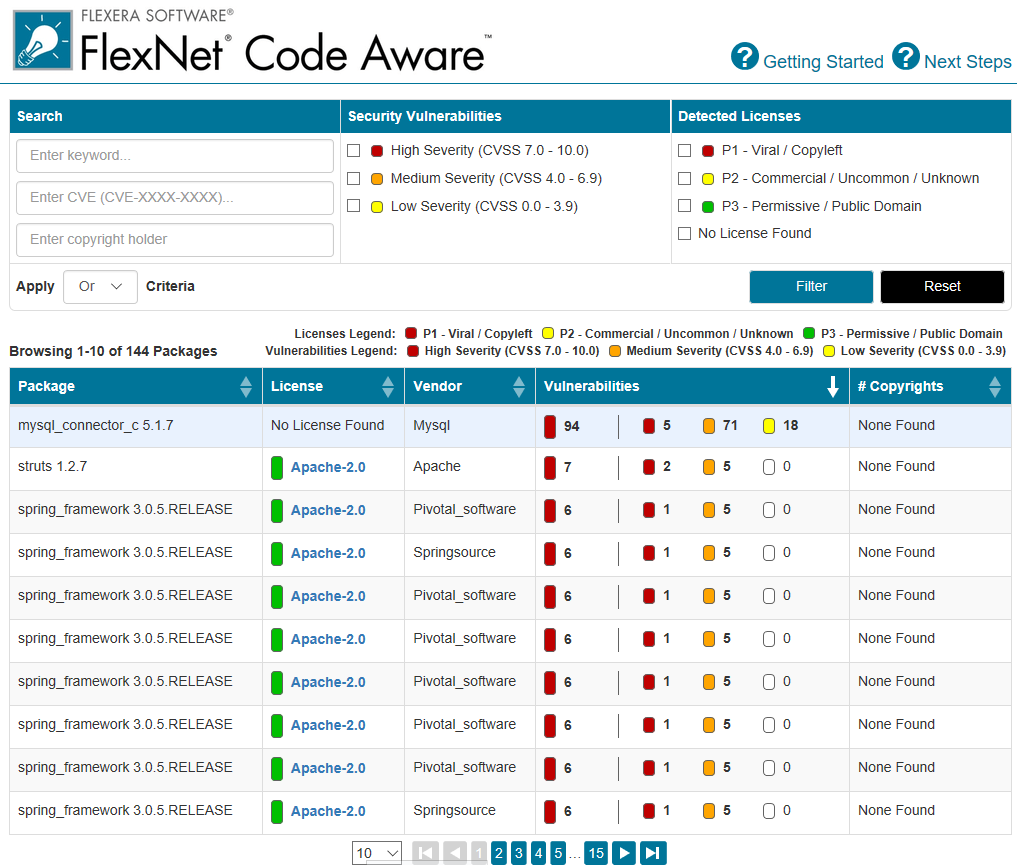
FlexNet Code Aware Package Inventory View
The Package Inventory view provides filters that you can use to execute targeted queries to refine the list to various package types of interest.
To view additional package details, click a vulnerability count listed in the Vulnerabilities column of the package you want to review:
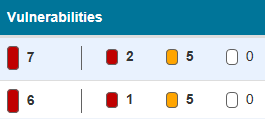
Vulnerabilities Column
The Vulnerabilities Detail page opens (covering a portion of the Package Inventory view), and displays detailed information on the selected package.
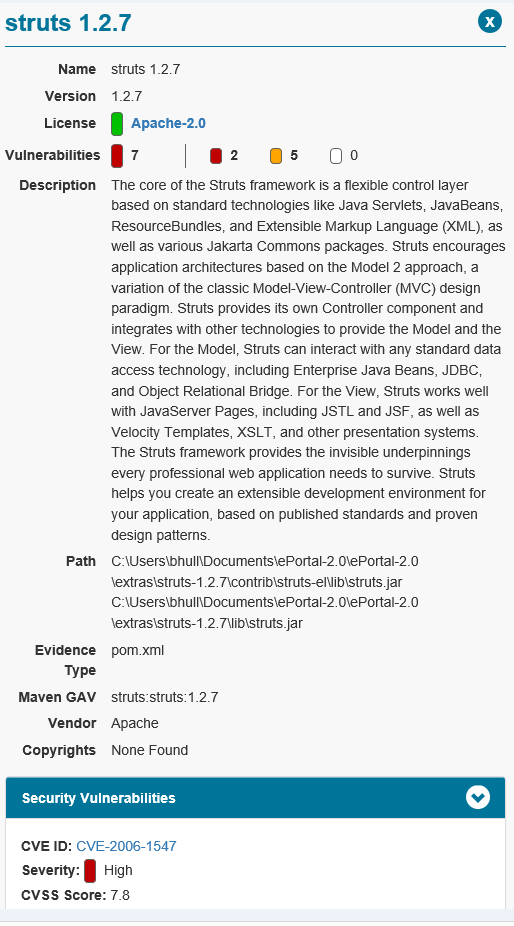
Vulnerabilities Detail
For detailed information on using FlexNet Code Aware, see Using FlexNet Code Aware to Perform Open Source Risk Assessment in the InstallAnywhere Help Library.
All InstallAnywhere Features Now in a Single Edition
Previous versions of InstallAnywhere were available in two different editions, Professional and Premier, with additional features included in add-on Virtualization and Cloud packs. Starting with InstallAnywhere 2018, all features are included in a single edition.
After upgrading to InstallAnywhere 2018, you will have access to all features, including these features that were previously only available in Premier Edition and with the add-on packs:
| • | Extensive run-time language support—InstallAnywhere includes default run-time strings in 32 supported languages, and gives you the ability to include custom localized splash screens in your installations. |
| • | Built-in support for creating upgrades—You can create upgrades that uninstall earlier versions of the product if present before installing the new version. |
| • | Instance management support—You can create installers that let end users install multiple instances of a product on the same machine. |
| • | Predefined and custom source path variables—You can use predefined source path variables in your installer, such as $IA_HOME$, $IA_PROJECT_DIR$, and $USER_HOME$. You can also use custom source path variables. |
| • | Build time variables—You can configure your project to use build-time variables, variables that have their values set at build time. |
| • | Flexible build configuration management—You can define tags to bundle related sets of actions, panels, features, and components, and assign the tags to the appropriate items in your project. Then you can associate the tags with specific build configurations to include or exclude items from builds. |
| • | Flexible build target management—You can create different build targets for each platform that your product supports. |
| • | Ability to add custom GUI panels—You can design your own custom panels that guide end users through the selection or completion of various UI elements such as text boxes, check boxes, and lists. |
| • | Merge module support—You can include merge modules in your installer project. |
| • | Project automation APIs—InstallAnywhere includes project automation APIs that let you design, modify, build, and test an installation from an InstallAnywhere project via Java code. |
| • | Docker support—You can use InstallAnywhere to configure and build Docker images, and deploy Web applications to the cloud as Docker images that are run as Docker containers. |
| • | Virtual appliance support—You can build enterprise-ready and cloud-ready multi-tier virtual appliances for VMWare ESX based on your existing InstallAnywhere projects. |
| • | Ability to share components with other products—You can optionally identify a component in your project as shared. At run time, if this type of component is not already present on a target system, the installer adds it. If it is already present, the installer registers it as shared. |
All existing customers will be upgraded to the full-featured, single edition.
Redesigned InstallAnywhere Advanced Designer User Interface
The user interface of InstallAnywhere 2018’s Advanced Designer has been redesigned and updated to provide a cleaner, more modern look, with a new black / gray / blue color scheme.
A user-friendly tabbed interface improves the ease of switching between views. Buttons on the Sequence tab have been repositioned to a more logical location above the Action lists.
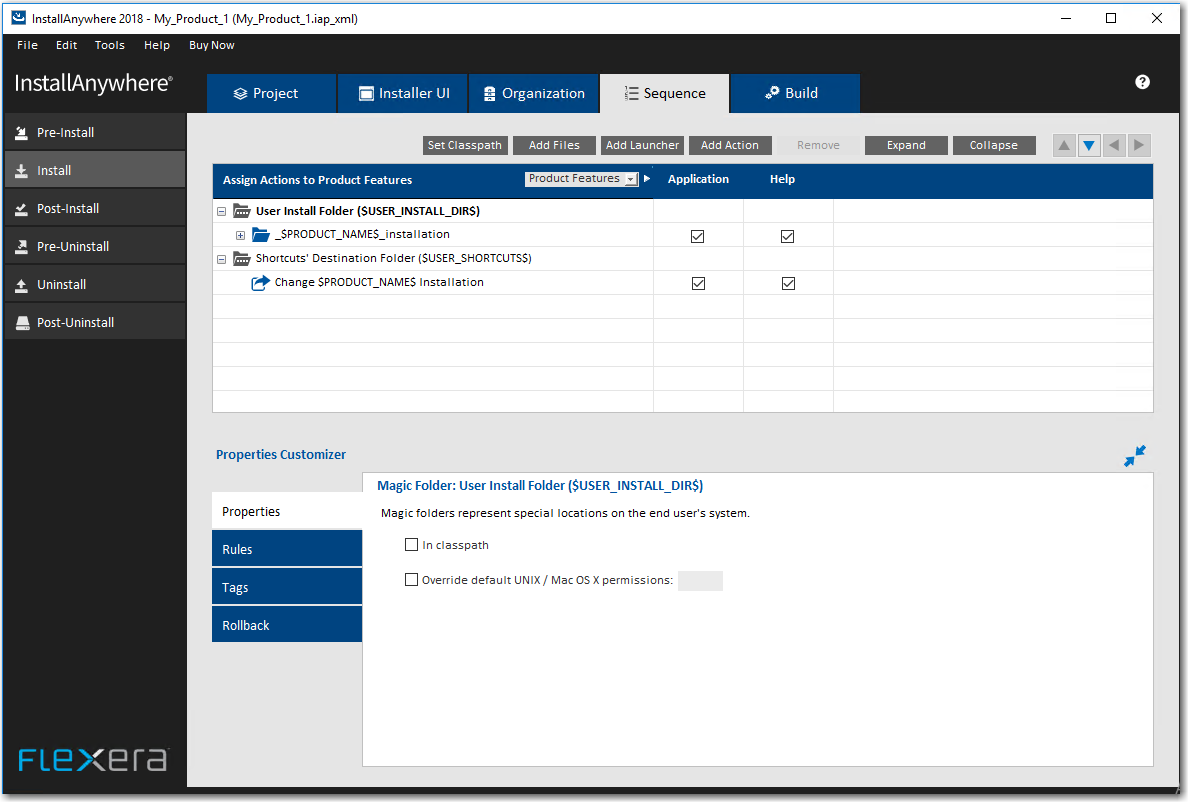
Redesigned Advanced Designer User Interface of InstallAnywhere
The Create/Open Project dialog box that opens when you launch InstallAnywhere has also been redesigned to be more user friendly.
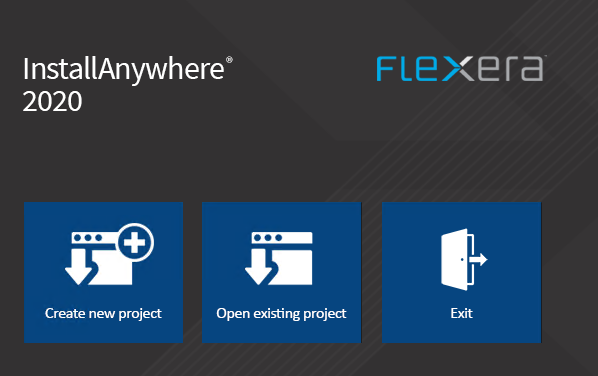
Redesigned Create/Open Project Dialog Box
When you click Create new project on the Create/Open Project dialog box, the redesigned Create New Project dialog box opens, prompting you to select the desired template to use, enter a name for the project, and select a location for the project.
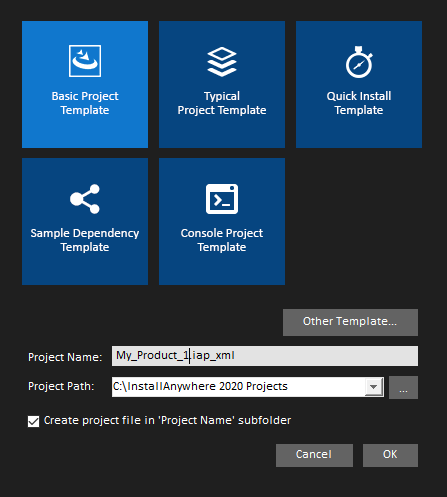
Redesigned Create a New Project Dialog Box
Enhanced Upgrade Installers Now Accommodate Maintenance Mode and Instance Management
In InstallAnywhere 2018, the behavior of upgrade installers has been enhanced to accommodate maintenance mode and instance management.
Previously, upgrade installers did not support maintenance mode or instance management. Upgrade installers could only upgrade an earlier version of an application (by uninstalling the previous version and installing the new version), or, if an earlier version does not exist, just install the new version.
In InstallAnywhere 2018, you can use an upgrade installer to add or remove features of a previously installed version as well as repair broken installations. You can also use an upgrade installer to specify whether multiple instances of a product can be installed on the same machine. At runtime, the user can choose which instance of the product to upgrade or perform maintenance on.
Note:This feature is not supported when performing a silent upgrade.
InstallAnywhere 2018 now supports the latest version of Java, Version 9. Using InstallAnywhere 2018, you can create installers that support Java 9, including:
| • | Creating Java 9 VM packs |
| • | Creating installers that bundle a Java 9 VM pack |
| • | Creating installers that can detect a Java 9 VM on the host and run automatically |
Ability to Customize the Windows File Properties of an Installer Executable File for a Windows Build Target
In previous releases, when you viewed the Details tab of the Windows Properties dialog box for an InstallAnywhere installer .exe file, information specific to the version of InstallAnywhere used to create the installer was displayed instead of information specific to the product being installed:

Details Tab of Windows Properties Dialog Box
The following hard-coded values were displayed for all Windows .exe installers created using InstallAnywhere:
| • | File description—Displayed InstallAnywhere Self-Extractor. |
| • | File version—Displayed the version of InstallAnywhere that was used to create the installer. |
| • | Product version—Displayed the version of InstallAnywhere that was used to create the installer. |
| • | Copyright—Displayed InstallAnywhere’s copyright information. |
For Windows installer .exe files created using InstallAnywhere 2018, the project-specific values entered on the on the Project > General Settings page of the InstallAnywhere project file are now displayed on the Details tab of the Windows Properties dialog box, instead of the previously hard-coded values.
Ability to Customize the Get Info Property Value for Copyright Field for an OS X / macOS Build Target
In previous releases, when you viewed the Copyright field on the Get Info dialog box for a Mac OS X build target for an installer targeting a OS X / macOS operating system, the copyright information specific to the version of InstallAnywhere used to create the installer was displayed instead of information specific to the product being installed:
In InstallAnywhere 2018, you can now customize the Get Info property value for the Copyright field for a Mac OS X build target.
The Copyright and Version fields can be edited on the InstallAnywhere Project > General Settings view under Product Information. The values entered here will be displayed on the dialog box that opens in OS X / macOS operating systems when you select the Get Info option.
Ability to Add Checkbox to Install Complete Panel to Launch Target Application or README File
In InstallAnywhere 2018, a new option has been added to configure the Install Complete panel to display a checkbox to prompt the user to launch a README file and/or launch a target application. The application could be either the main target application of the product that was just installed, or a utility installed alongside the product.
Option to Disable Logging Upon User Cancellation During Pre-Install Sequence
A new option has been added to enable you to disable logging if the user cancels an installation during the Pre-Install sequence.
To disable logging, open the Project > General Settings view of the Advanced Designer, scroll down to the Log Settings group, and set the Skip Logging in Pre‑Install option to Yes.
Execute Script/Batch File Action Run in Console Mode Now Writes Action Type and Identifier to Console
When run in console mode, an InstallAnywhere installer displays a Please Wait message during installation for each Execute Script/Batch File action and Execute Command action included in the Install Sequence or Post-Install Sequence.
In InstallAnywhere 2018, an installer running in console mode now identifies each action that displays a Please Wait message by also displaying the type of action (Execute Script/Batch File or Execute Command) and an action title/name.
In Console Mode, User Can Now Move Forward Without Scrolling Through the Entire License Agreement
In InstallAnywhere 2018, a new option has been added to enable users using a console mode installer to proceed to the next step without scrolling through the entire license agreement.
When you add a License Agreement console screen to an installer on the Sequence > Pre-Install page, you can now select the Do not force user to scroll through license agreement option.
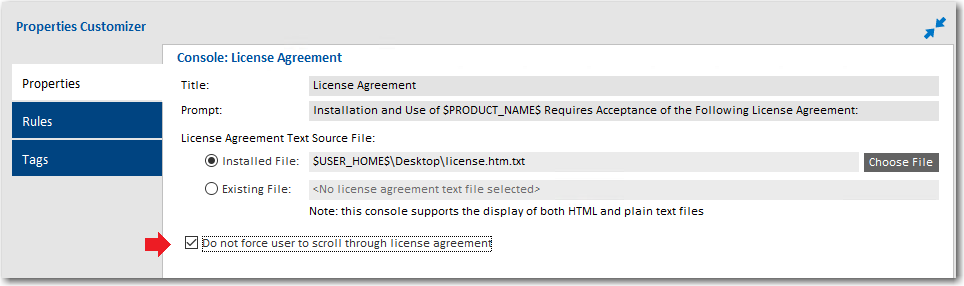
Properties Tab of Console: License Agreement Console Screen
When this option is selected, users using a console mode installer will be able to accept or reject the license agreement without scrolling through all of the text of the license agreement. The following text will be displayed:
PRESS ANY KEY TO CONTINUE TO READ LICENSE AGREEMENT OR PRESS '0' to ADVANCE TO END
Note:To control whether a user using a panel mode installer can proceed to the next step without scrolling through the entire license agreement, use the Force user to scroll through license agreement option on the Properties tab of the Panel: License Agreement > Properties tab.
Ability to Set Compiler Flags, Such as SafeSEH, for Executables Installed on Windows
In previous releases, executables installed on Windows did not meet security requirements because compiler flags, such as SafeSEH, were not set. In InstallAnywhere 2018, compiler flags are now set properly for executables installed on Windows. These executables now pass the SafeSEH check.
Support has been added to LaunchAnywhere (32-bit and 64-bit) and SelfExtractor (32-bit and 64-bit) projects for the following flags:
| • | /SAFESEH—This is applicable only for 32-bit target and not applicable for 64-bit targets. Therefore, for all 64-bit build configurations, we have set this flag to NO. |
| • | /HIGHENTROPYVA—This is applicable only for 64-bit executable images. This is not applicable for 32-bit executable images. |
ANT Version Associated with Execute ANT Script Action Updated to ANT 1.9.9
In InstallAnywhere 2018, the ANT version associated with the Execute ANT Script action has been updated to ANT 1.9.9 for both InstallAnywhere development and InstallAnywhere runtime.
ANT 1.9.9 supports Java 1.5 and above. For more information, see:
http://ant.apache.org/manual/install.html
https://ant.apache.org/faq.html
InstallAnywhere 2018 now includes a new Compare Versions rule that enables you to specifically compare two version numbers during an installation. This new rule is displayed on the Choose a Rule/Expression dialog box that opens when you click Add Rule on the Organization or Sequence page.
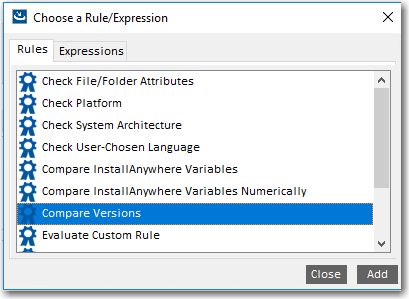
New Compare Versions Rule
When you add a Compare Versions rule, you are prompted to enter two operands and an operator in the Compare Versions Properties Customizer. Both operands may be expressed as either an InstallAnywhere variable being resolved (such as $VARIABLE1$) or as a literal version number string (such as 1.0.0.0).

Compare Versions Rule Properties Customizer
Expand/Collapse Buttons on Sequence Page Views
In InstallAnywhere 2018, an Expand and a Collapse button have been added to views on the Sequence page to quickly collapse or expand the items in the Action List tree.
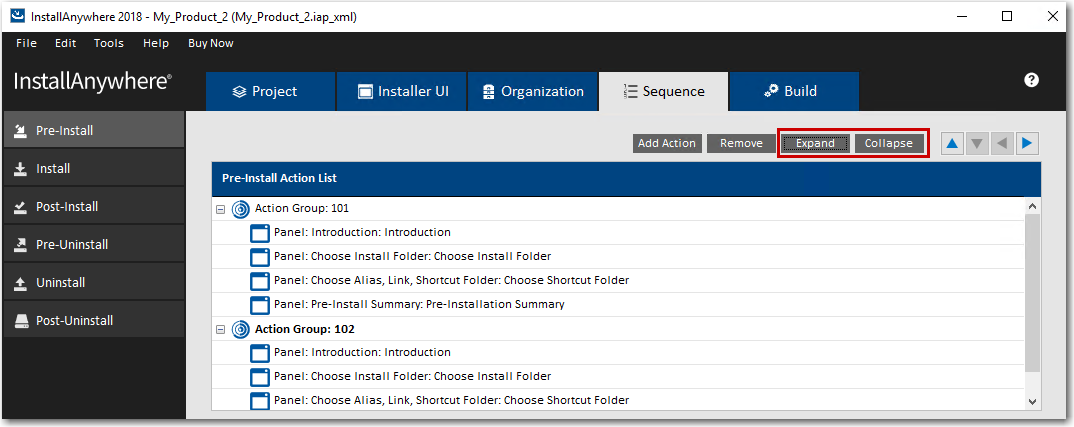
New Expand and Collapse Buttons on the Sequence Page
When you click the Collapse button, the items in the tree are collapsed into their primary item:

Collapsed Items in the Tree
Get Password Action Console Panel Now Available in Pre‑Uninstall and Post-Uninstall Phases
Previously, you could not add a Console: Get Password action during Pre-Uninstall and Post-Uninstall tasks for console mode installers.
In InstallAnywhere 2018, you can now add a Console: Get Password action during Pre-Uninstall and Post-Uninstall tasks for console mode installers. You can also add a Console: Get Password action during Pre-Uninstall and Post-Uninstall tasks after adding a merge module project, which previously was not possible.
New User-Defined Range of Installer Exit Codes
InstallAnywhere 2018 now includes a range of user-defined installer exit codes. These can be used to act upon scripts that are included in your installers. The following 20 exit codes were added for customer use:
|
Category |
Exit Codes |
|
Linux Exit Codes |
43 to 62 |
|
Other Exit Codes |
10795 to 10814 |
New Variable to Store Response File Location
A new InstallAnywhere variable named $IA_RESPONSEFILE_PATH$ has been added to store the complete location of a response file being used by the installer.
Launching Build from User Interface Now Leaves Current Project Unchanged
In previous releases, when you initiated a build from the InstallAnywhere user interface, InstallAnywhere would first save the current project before performing the build. However, if you initiated a build from the command line, a new build copy of the current project would be made (projectBuild.iap_xml) before the build was performed, leaving the original project unchanged.
In InstallAnywhere 2018, the behavior when you initiate a build from the user interface matches the behavior when launching a build from the command line. In both cases, a build copy of the project file is made prior to the build, leaving the original project file unchanged.