InstallShield 2019
Project • This information applies to the following project types:
| • | Basic MSI |
| • | DIM |
| • | InstallScript |
| • | InstallScript MSI |
| • | Merge Module |
| • | MSI Database |
| • | Transform |
In order for your installation to add a new element or attribute to an XML file, or to perform some other change to an XML file at run time, MSXML must use the XPath expressions that are defined in the XML File Changes view to navigate through the XML file and locate the areas that need to be modified.
For detailed information about writing XPath expressions, see the following Web sites:
| • | World Wide Web Consortium (http://www.w3.org) |
| • | W3 Schools (http://w3schools.com) |
The following sections show examples of how to create some basic XPath expressions.
Example 1: Adding Two Elements
In example 1, the installation adds the bold lines in the following XML document:
<?xml version="1.0" encoding="UTF-8"?>
<Books>
<Biographies>
<Book Author="Bill Smith" Copyright="2007">Bill's Great Biography</Book>
<Book Author="John Smith" Copyright="2006">John's Great Biography</Book>
</Biographies>
</Books>
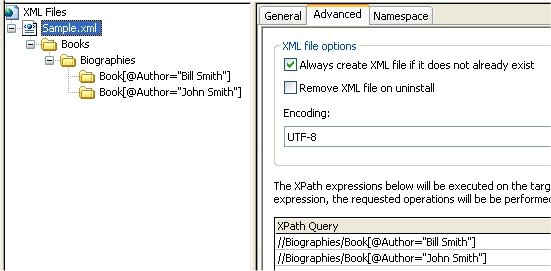
To add those elements, the following XPath expressions are added under the Biographies node in the XML File Changes view:
Book[@Author="John Smith"]
Book[@Author="Bill Smith"]
The following screen shots show the settings in the XML File Changes view.
Settings for the Sample.xml File

Settings for the Biographies Node, which Contains the Child Nodes to Be Added
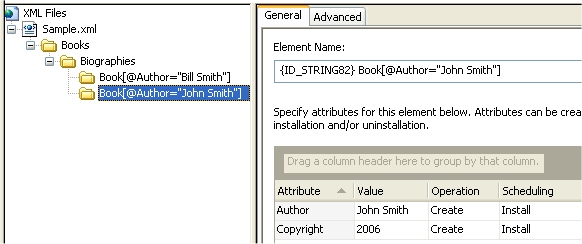
General Settings for One of the Child Nodes to Be Added

Advanced Settings for One of the Child Nodes to Be Added
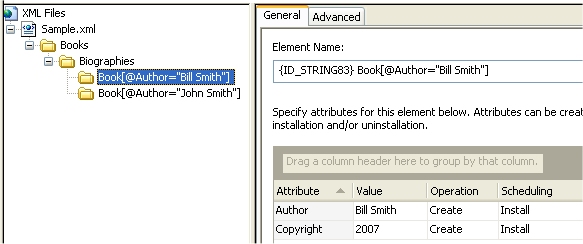
General Settings for One of the Child Nodes to Be Added
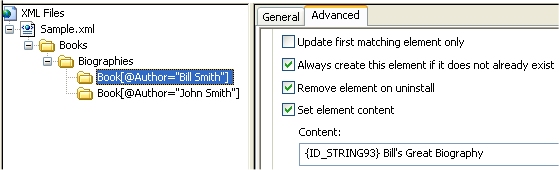
Advanced Settings for One of the Child Nodes to Be Added
Example 2: Adding Attributes to Elements
In example 2, the installation adds the bold attributes and values in the following XML document:
<?xml version="1.0" encoding="UTF-8"?>
<Books>
<Biographies>
<Book Author="Bill Smith" Copyright="2007" Publisher="Bill & John's Publish Co.">Bill's Great Biography</Book>
<Book Author="John Smith" Copyright="2006" Publisher="Bill & John's Publish Co.">John's Great Biography</Book>
</Biographies>
</Books>
The following screen shot shows the settings in the XML File Changes view.
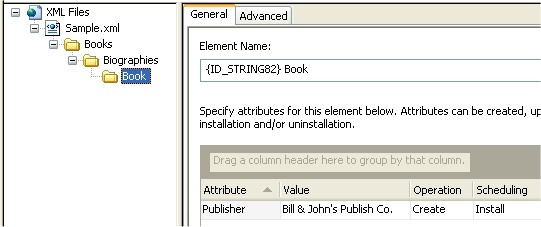
Settings for the Book Node
Example 3: Updating an Attribute’s Value
In example 3, the installation searches for the attribute that has the 2006 Copyright value (as shown in bold in the following XML document) and replaces its value with a 2007 Copyright value:
<?xml version="1.0" encoding="UTF-8"?>
<Books>
<Biographies>
<Book Author="Bill Smith" Copyright="2007" Publisher="Bill & John's Publish Co.">Bill's Great Biography</Book>
<Book Author="John Smith" Copyright="2006" Publisher="Bill & John's Publish Co.">John's Great Biography</Book>
</Biographies>
</Books>
To update the value, the following XPath expression is added under the Biographies node in the XML File Changes view:
Book[@Copyright="2006"]
The following screen shot shows the settings in the XML File Changes view.
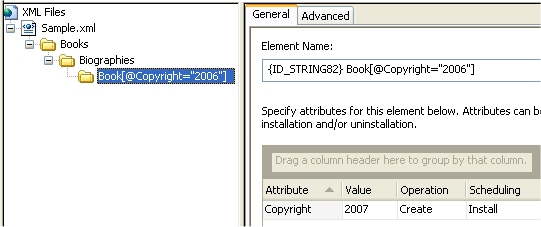
General Settings for the Attribute to Be Updated
See Also
InstallShield 2019 Help LibraryApril 2019 |
Copyright Information | Flexera |