Notification Destinations
You can configure one or more delivery destinations for the same notification. The following destinations are available when sending a conditional notification:
| • |
| • | Webhook |
| • | SFTP (available only for scheduled notifications) |
At least one destination is required, but you can enable all available options—email, webhook, and SFTP—simultaneously for a single alert.
Use the Email destination to deliver notifications by email. The message sent to recipients includes a link to download the query results, which remain available for 7 days.
Note:If Webhook or SFTP destinations are also configured, the resulting email also includes the status of the webhook and SFTP delivery attempts, indicating whether each process completed successfully.
To configure Email as delivery notification
| 1. | In the Configure Email Notification pane, provide the following information: |
|
Field |
Description |
|
Recipients |
Type the email address and confirm the address by pressing Enter. You can add multiple email addresses. |
|
Subject |
By default, the notification name and type are added as the email subject; you can change this as required. |
| 2. | Craft the email message body in the Message Template pane. |
| • | Select one or more fields from the Insert Entity Column dropdown menu to add them to the message body. |
| • | You can format the message body with any of the standard options provided, including bold, italic, and underline. There are also justification and link options. |
| • | Click the </> HTML Mode button to display the message body content as HTML code. When in HTML mode, the Preview button appears, which lets you view the message body as it will be displayed when the email is sent. |
| • | The Show Preview/Hide Preview toggle button lets you display or hide a preview of your email message at the bottom of the Message Template pane. |
| 3. | Click Save Notification. |
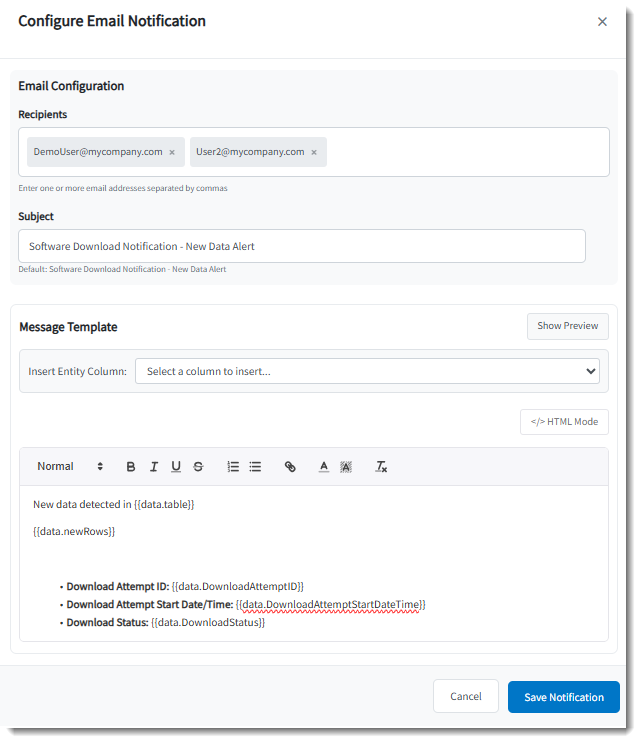
Overview of the Configure Email Notification pane.
Use the Webhook destination to send data to an external Webhook URL.
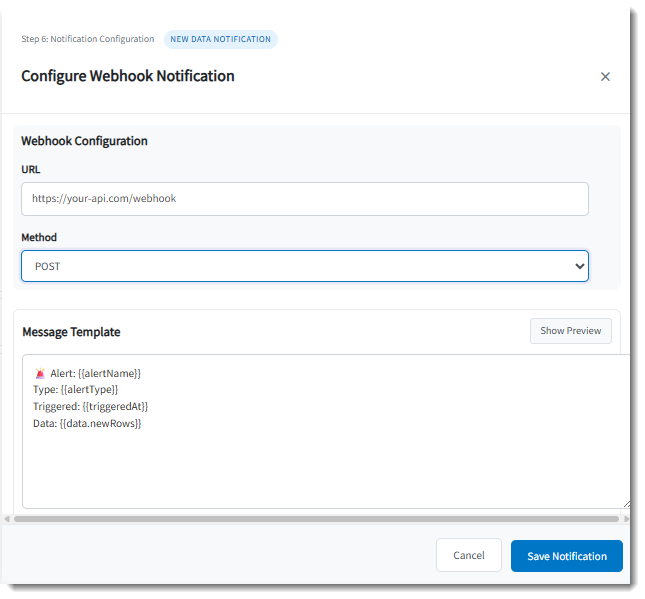
Overview of the Configure Webhook Notification destination for a conditional notification
Specify the following:
|
Field |
Description |
||||||
|
URL |
The URL that should receive the data when an event occurs. |
||||||
|
Method |
Select the request type:
|
||||||
|
Message Template |
Drag the variables from the Available Variables area to build your message that will be delivered to the webhook URL. |
||||||
|
Available Variables |
Lists the variables that can be used for the message. |
Click Show Preview to display a preview of the code that will be delivered to the webhook.
For example, you could create the following message:
Alert: {{alertName}}
Type: {{alertType}}
Triggered: {{triggeredAt}}
Data: {{data.newRows}}
For the sample values above, the webhook site will receive a payload similar to the following:
Alert: Software Download Notification
Type: newData
Triggered: 09/02/2026, 12:15:42
Data: {
"rows": [
{
"id": 1,
"name": "Sample"
}
]
}
The SFTP destination is available only for scheduled notifications. Use this destination type to automatically export notification results as files to an SFTP server.
Specify the following:
|
Step |
Description |
||||||||
|
Step 1: Connection Define the connection details for the SFTP server. |
Host—Enter the hostname or IP address of the target SFTP server. |
||||||||
|
Port—Specify the port for SFTP connections (default: 22). |
|||||||||
|
Username—Provide the SFTP account username. |
|||||||||
|
Authentication Method Select one of the available authentication options:
If the private key is encrypted, specify the Passphrase. |
|||||||||
|
Remote Directory—Enter the directory path on the SFTP server where exported files will be saved. |
|||||||||
|
Host Key Fingerprint (Optional)—If required by your security policy, provide the server's fingerprint for host validation. |
|||||||||
|
Test Connection—Use this option to verify that the connection details are correct before proceeding. |
|||||||||
|
Step 2: Transfer Settings Configure how the exported file is named, formatted, and handled on the SFTP server. |
Filename Template—Define a dynamic filename using the tokens listed below the field. Example: ${alertName}_${timestamp(YYYYMMDD)}_${filterValues} |
||||||||
|
Export Format—Select the format for exported data:
|
|||||||||
|
CSV Delimiter (CSV only)—At present, only the comma (,) is supported as delimiter for CSV output. |
|||||||||
|
Include Header Row—Enable this option to include a header row with column names. |
|||||||||
|
Overwrite Policy—Select what should happen if the file already exists on the SFTP server:
|
|||||||||
|
Atomic Write—Select to write the file to a temporary name first and rename it once complete. This prevents partial file reads on the SFTP server. |
|||||||||
|
Step 3: Visibility & Metadata Provide information that helps users find and manage the SFTP destination. |
Display Name—Enter a user-friendly name (e.g., "Customer Alerts SFTP"). |
||||||||
|
Description—Optional notes about the intended use of this destination. |
|||||||||
|
Enabled—Controls whether the destination is active. |
|||||||||
|
Visibility—Choose whether the destination is visible to:
|
|||||||||
|
Step 4: Review & Save Before saving, review the JSON preview summarizing your configuration. Click Save Notification to finalize the destination. |
A typical configuration preview may include values such as: { "type": "sftp", "enabled": false, "config": { "host": "port": 1017, "username": "user@mycompany.com", "authMethod" : "password", "passwordRef": "***", "remoteDir": "fileNameTemplate": "${tenantd}_${alertId}_S{date:YYYYMDD}_S{time:HHmmss}", "format": "csv", "csvOptions": { "delimiter": "quote": "header": true } "atomicWrite" : true, "overwritepolicy": "overwrite", "compression": "none”, "displayName": "visibility": "org", "description": "" } } |