Sample Custom CSS File
You can create a custom CSS file to override any of the style settings used by default for the End-User Portal. You can also add classes to the custom CSS file to format a custom header or footer, should you want to use those.
The custom CSS file only needs to include CSS classes for those you want to override and for any classes you use in a custom header or footer.
CSS for Custom Header and Footer
The following is an example of CSS classes that could be added to format a custom header and footer (as described in Sample Header File and Sample Footer File):
div.myheader {
background-color: #FFFFFF;
width: 100%;
height: 75px;
padding: 0;
}
div.myfooter {
width: 100%;
height: 75px;
display: flex;
align-items: center;
font-family: Calibri;
padding-left: 12px;
border-top: 1px solid #969696;
border-bottom: 1px solid #969696;
background-color: #f5f5f5;
}
div.myfooter .mysupport {
font-family: Calibri;
font-size: 16px;
}
CSS to Override Default Class
You may want to override a default style used in the End-User Portal, such as the appearance of the widgets on the Home page.
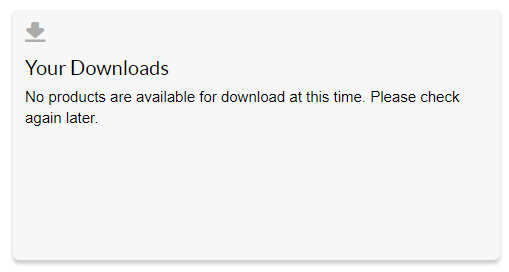
Default appearance of Your Downloads widget on Home page
If you wanted, for example, to make the heading of this widget bold and change the background color, your first step would be to determine what CSS is currently being applied to that element on the page. To do this, you would use your browser’s Inspect tool. Then you would add classes to the custom CSS file corresponding to those classes.
Important:Adding a custom CSS to your End-User Portal site could have site-wide consequences. Therefore, only users with advanced CSS knowledge should attempt to override the default CSS classes.
Note:The following instructions are for the Chrome browser, but other browsers have similar functionality.
To identify existing CSS classes and overriding them in a custom CSS file
| 1. | In the End-User Portal, put your cursor on the area of the screen that you want to change, right-click and then select Inspect from the context menu. The Inspect panel opens on the right side of the screen, displaying the underlying HTML code: |
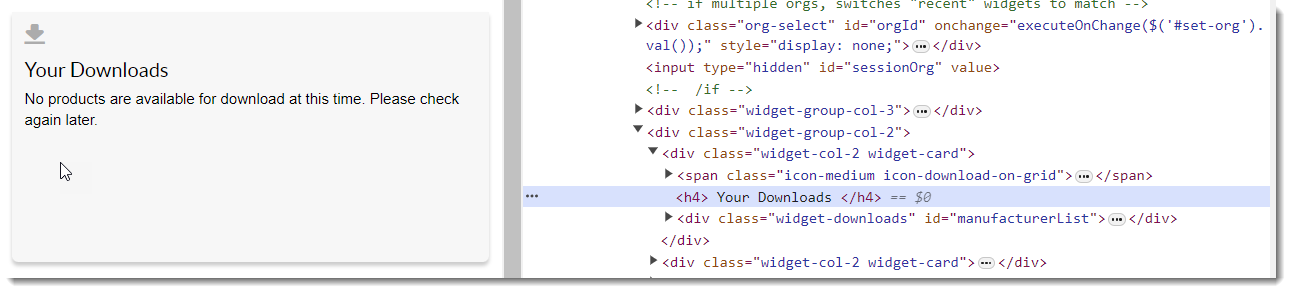
| 2. | Identify the HTML code that is applicable to the element you want to change. In this example, the widget itself is defined by the following div tag: |
<div class="widget-col-2 widget-card">
The title of the widget is defined by this element:
<h4>Your Downloads</h4>
| 3. | Enter CSS overrides into a custom.css file that makes the changes that you want to see. To change the background color of all widgets on the Home page, enter something like this: |
.widget-card {
background-color: #ADD8E6!important;
}
To change the font weight of the title of all of the widgets on the Home page, enter something like this:
.widget-card h4 {
font-weight: 700!important;
}
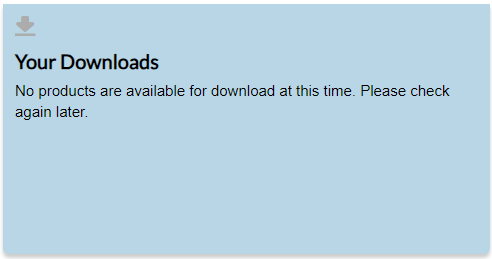
| 4. | Upload the custom CSS file. The Home page widgets should now look like this: |
| 5. | The final step is to test your entire site to see if these changes have resulted in any unwanted results. If you find that these changes have been applied to areas of the site that you did not intend, you have to change the CSS classes in the custom CSS file to be more specific to exactly what you wanted to change. |