Setting Up User Synchronization in FlexNet Operations
You configure the user synchronization on the Manage User Synchronization page. You can set up synchronization for only one portal, both portals, or none. The setup process is identical for both portals. It involves the following steps:
Configuring User Association to Account
You must specify the account that synchronized users will be associated with in FlexNet Operations.
To associate synced users with an account
|
1.
|
Click Administer > Manage User Synchronization. The Manage User Synchronization page is displayed. |
|
2.
|
Select the portal to configure: |
|
•
|
For the Producer Portal, under Configure User Synchronization for Producer Portal, click Configure. |
|
•
|
For the End-User Portal, under Configure User Synchronization for End-User Portal, click Configure. |
|
3.
|
Select the Enable User Synchronization checkbox. |
Tip:This checkbox allows you to toggle synchronization on or off without losing your saved configuration.
|
4.
|
Define the account to which synced users will be associated. Choose from the following options: |
|
•
|
Use an account—Select this option if all synced users should be associated with a specific account. Use the Select Account dropdown to choose from existing accounts in your organization. |
Tip:This method works best when combined with IdP group mapping to FlexNet Operations roles (see Mapping IdP Groups to FlexNet Operations Roles), as it minimizes manual intervention.
|
•
|
Use the locked account—Select this option to associate synced users with the default account created during IdP sync: |
|
•
|
IDP_SYNC_DEFAULT_PRODUCER for the Producer Portal |
|
•
|
IDP_SYNC_DEFAULT_CUSTOMER for the End-User Portal. |
Tip:This option is ideal if you are creating users for multiple FlexNet Operations accounts. In a later step, discussed in section Assigning Users to Accounts Post Sync, you can map these users to an account of your choice and also assign them a role.
Mapping IdP Groups to FlexNet Operations Roles
Optionally, if your IdP organizes users into groups, you can map each group to one or more FlexNet Operations roles. Upon sync, users from these groups will be assigned the role(s) that you specified for their group.
Example: If your IdP has a group called Customer Support and you want to give all users in this group the roles Customer Rep 2.0 and IT BackOffice Manage, you could add the following row:
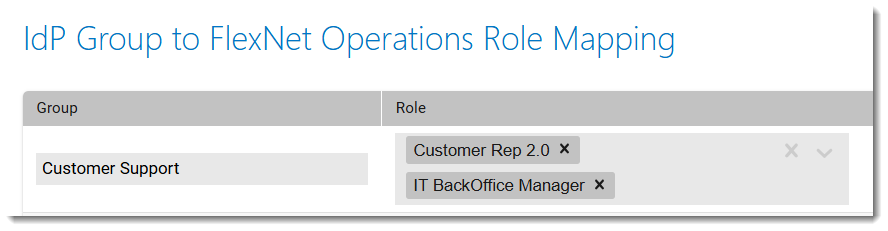
The Customer Support group from the IdP is mapped to two roles in FlexNet Operations: Customer Rep 2.0 and IT BackOffice Manager. This mapping ensures that users in the specified IdP group are automatically assigned the selected roles upon synchronization.
If groups are not mapped to roles, or if a user does not belong to a group, they are automatically created in FlexNet Operations and assigned the default role:
|
•
|
Default Producer Role for the Producer Portal |
|
•
|
Default Portal Role for the End-User Portal |
These default roles grant only the View Feature permission, which allows users to view the Home page and access the Logout button.
To map IdP groups to FlexNet Operations roles
|
1.
|
Click Administer > Manage User Synchronization. The Manage User Synchronization page is displayed. |
|
2.
|
Select the portal to configure: |
|
•
|
For the Producer Portal, under Configure User Synchronization for Producer Portal, click Configure. |
|
•
|
For the End-User Portal, under Configure User Synchronization for End-User Portal, click Configure. |
|
3.
|
Select the Enable User Synchronization checkbox. |
|
4.
|
In the section IdP Group to FlexNet Operations Role Mapping, click Add to add a new row to the mapping table. |
|
5.
|
Under Group, type the group name of a group defined in your IdP. |
Important:The group name must be entered exactly as it appears in your IdP, including capitalization.
|
6.
|
Under Role, click the corresponding empty field next to the group name. A dropdown menu will appear with a list of predefined roles in FlexNet Operations. |
|
7.
|
Choose one or more roles by clicking on them. Selected roles will appear as labeled boxes in the field. |
|
8.
|
To remove a role, click the X next to the role’s name. |
|
9.
|
To remove an entire row, click the trash can icon next to the row. |