Creating an SBOM Part Manually
Use the following procedure to create an SBOM part manually.
To create an SBOM part manually:
| 1. | Click Manage SBOM Parts in the left navigation panel to open the Manage SBOM Parts page. |
| 2. | Click the Create SBOM Part button in the upper right of the page. |
The Create SBOM Part slideout opens, showing the fields used to create an SBOM part. (All required fields have a red asterisk next to their label.)
| 3. | From the Bucket dropdown list, select the bucket to which you want to add the SBOM part you are creating. |
| 4. | Complete the remaining fields as needed. For field descriptions, see Fields Used to Define an SBOM Part. |
| 5. | Click Save to create the SBOM part. |
A message in the top right corner of the page confirms that the SBOM part was successfully created. (If you did not enter a required field, it is highlighted in red and must be completed before the part can be saved.)
| 6. | To view the new SBOM part, see Viewing SBOM Parts. |
Watch a Demo
The following video demonstrates how to create an SBOM part manually using Component Lookup.
This video demonstrates how to create an SBOM part manually using freeform input.
Fields Used to Define an SBOM Part
Use these fields to create an SBOM part. In the UI, all required fields have a red asterisk next to their label.
|
Field |
Description |
||||||||||||||||||||||||
|
Bucket |
Select the bucket to which you want to add the SBOM part. |
||||||||||||||||||||||||
|
How would you like to create your SBOM part? |
Select the method to identify the component instance (component, version, and license) with which you want to associate the SBOM part. For an explanation of reasons for using either method, see Methods Available for Creating an SBOM Part.
When you click the associated Lookup button, the Component Lookup slideout opens, enabling you to start the search process. See Using Component Lookup to Select a Component Instance for the SBOM Part for next steps. Once you have selected the component instance, you can continue editing the SBOM part.
|
||||||||||||||||||||||||
|
Name |
Enter the name of the component (usually in componentName version (license) format) associated with the SBOM part. |
||||||||||||||||||||||||
|
Part Type |
Select the entity type of the component represented by the SBOM part. The supported types are derived from SPDX and CycloneDX specifications and include the following:
|
||||||||||||||||||||||||
|
Do you want to link part? |
If you want to link the SBOM part to another part in the same bucket to identify a relationship between the parts, select Yes. When you click the associated Lookup button, the SBOM Part Lookup slideout opens, enabling you to select the other part. (See Linking the Current SBOM Part to Another Part for the next steps.) After you establish the link, you can continue creating the SBOM part. If you do not want to establish a link with another part, select No. Note:When you select Yes, the Lookup button is enabled only if you have a selected a bucket in the Bucket field for the SBOM part you are creating. (The bucket must be identified because the part that you select for the link must exist in the same bucket as the SBOM part you are creating or editing.) |
||||||||||||||||||||||||
|
Package URL (PURL) |
Enter the PURL (package URL) for the component represented by the SBOM part. A PURL is an attempt to standardize existing approaches to reliably identify and locate software packages. A PURL is a URL string used to identify and locate a software package in a mostly universal and uniform way across programing languages, package managers, packaging conventions, tools, APIs, and databases. Refer to the package-url/purl-spec page on GitHub for additional information. |
||||||||||||||||||||||||
|
URL |
Enter the URL for forge repository of the component. |
||||||||||||||||||||||||
|
Description |
Enter a description of the component. |
||||||||||||||||||||||||
|
Copyrights |
Enter the copyright information associated with the component. |
||||||||||||||||||||||||
|
Notices Text |
Enter the license text associated with the component. |
||||||||||||||||||||||||
|
Technopedia ID |
Provide the following link to the Technopedia documentation: https://resources.flexera.com/web/media/documents/Datasheet-DP-Technopedia.pdf |
||||||||||||||||||||||||
|
Associated Files |
Enter the path for each file associated with the SBOM part. (The paths are relative to software entity represented by the bucket.) |
||||||||||||||||||||||||
|
Notes |
Enter any notes or analyses that you want an SBOM reviewer to know about. |
Using Component Lookup to Select a Component Instance for the SBOM Part
When you click the Lookup button next to the How would you like to create your SBOM part? field on the Create SBOM Part or Edit SBOM Part page, the Component Lookup slideout opens. From this slideout, you use the Component Lookup feature to search the SBOM Insights Catalog, Revenera Data Library, and external resources for the component instance (component name, version, and license) that the SBOM part you are creating (or editing) will represent.
When you are editing an existing component, the Component Lookup slideout is pre-filled with search criteria and results pertaining to the SBOM part’s current component. This enables you to select a new instance of the same component without setting up and performing a search.
To use the Component Lookup feature to select a component instance for the SBOM part:
| 1. | On the Component Lookup slideout, search for the new component by entering a string in the field for the type of search you want to perform. |
| • | To search by component name, enter a name string in the Component field. |
| • | To search by the URL of the component’s forge repository, enter a URL string in the URL field. |
If you entered the exact component name or URL, select Exact from the Match Type dropdown list.
If you entered a partial string for either field, select the appropriate value from Match Type dropdown list: Contains, Starts With, or Ends With.
Note:You can enter a string in both the Component and URL fields. Keep in mind that the Match Type you select applies to both values. The search results will include only those components that meet all the specified criteria.

Tip:Providing the exact component URL as the search criterion usually produces the result you want. Best practice is to use your browser to locate the desired component’s third-party repository or project site within a forge, such as GitHub, NuGet, or NPM (or the appropriate forge). Copy the URL of the repository or project and paste it into the URL search field. This will result in the exact name for the component.
| 2. | Click Search to display the list of components that match your criteria. |
| 3. | If you locate the instance that comprises the component, version, and license you want, skip to step 6. |
or
If you locate an instance containing the component you want but without a version, continue with the next step to select the version.
| 4. | Double-click Select... in the Version column (and click the down arrow) to display a list of available versions for the component. Select the version you want. |

If licenses are available for you to associate with the component version, Select... is displayed in the Licenses column. Continue with the next step. However, if a hyphen is displayed in the Licenses column (indicating no license association is available), skip to step 6.
| 5. | Double-click Select... in the Licenses column (and click the down arrow) to display a list of available licenses for the component version selected. Then select the license(s) you want to associate with the component version. |

| 6. | Scroll to the end of the component row and click Use Instance. |

Once you click Use Instance, the following fields are made available on the Create SBOM Part or Edit SBOM Part slideout. They show the component name and version, selected licenses, and security vulnerability counts (by severity), respectively.
| • | Component |
| • | Selected Licenses |
| • | Vulnerabilities bar graph |
Additionally, the Name field for the SBOM part is populated with the instance name in component version (license) format.
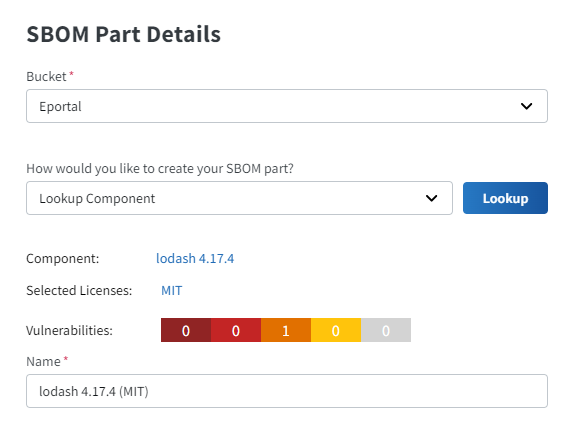
Note:Clicking anywhere on the Vulnerabilities bar graph opens a slideout that provides details for the security vulnerabilities associated with the part (see Viewing Security Vulnerability Details for an SBOM Part for more information). If no known vulnerabilities exist for the instance or this information cannot be obtained, a hyphen (-) replaces the bar graph.
| 7. | Continue with the creation or editing of the SBOM part as described in Creating SBOM Parts Manually or Editing an SBOM Part, respectively. |
Linking the Current SBOM Part to Another Part
You can link the SBOM part that you are creating or editing to another part in the same bucket to identify a relationship between the two parts. When you click the Lookup button next to the Do you want to link part? field on the Create SBOM Part or Edit <SBOM part> page, the SBOM Part Lookup slideout opens, showing a list of SBOM parts in the bucket. The following procedure describes how to select a part from the slideout and then identify the link relationship.
To establish a link between the SBOM part and another part in the same bucket:
| 1. | On the SBOM Part Lookup slideout, locate the SBOM part with which to link the part that you are creating or editing. |
| 2. | Scroll to the end of the selected row and click Select SBOM Part. |
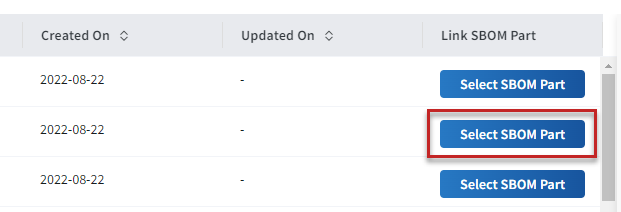
The slideout closes, and the name and licenses of the selected part are displayed in the Linked Part Name and Linked Part Selected Licenses fields on the Create SBOM Part or Edit SBOM Part page. (These fields along with Part Link Type field are available only after you have selected a part on the SBOM Part Lookup slideout.)
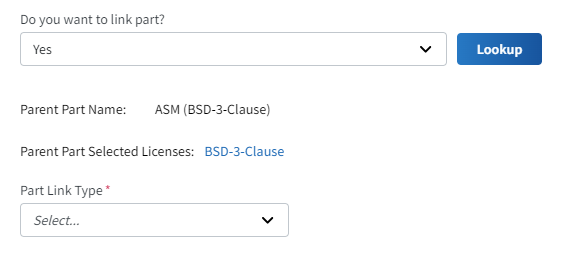
| 3. | From the Part Link Type dropdown list, select the value that identifies the relationship between the current part and the linked part. The current part is always the first element in the relationship syntax. For example, if you select the type Build Dependency of, the relationship syntax reads “the currentPart is a build dependency of the linkedPart”. |
The available link types are based on SPDX and CycloneDX specifications for identifying relationships between open-source, third-party, and commercial components in software. For a description of the relationships, refer to SPDX Specification, Clause 11: Relationship between SPDX Elements Information.
| 4. | Continue with the creation or editing of the SBOM part as described in Creating SBOM Parts Manually or Editing an SBOM Part, respectively. |