Scheduling Exports
This feature lets you automatically produce exports at specified intervals and send them to your email address (the email that you use to log in to FlexNet Operations). You will receive a download link which is valid for 7 days from the date of creation. You can also schedule a one-off export. This is useful when you want to download large amounts of data, because you are not forced to stay on the page until the download has completed.
The Schedule option is available from the Export dialog that displays when you perform a download. For more information on the Download feature, see Downloading Data. Once created, you can then view, manage, and download your scheduled exports using the Download Manager (see Using the Download Manager).
Note:Scheduling exports is similar to the Subscription functionality. However, with scheduled exports, the download link is sent to the currently logged-in user, whereas subscriptions can be set up for any email address that will receive an email with a download link. For more information about subscriptions, see Subscribing to Dashboards.
To schedule an export
| 1. | Do one of the following to open the Export dialog: |
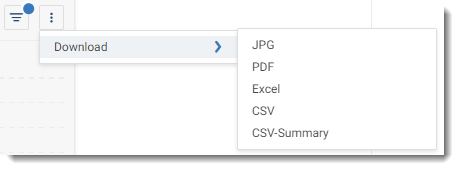
| • | To download data for an individual dashboard, table, or report, click the three dots menu in the upper right corner of the chart or table, point to Downloads and then click the desired download format. |

| • | To download data for an entire dashboard, open the relevant dashboard and click the button with the three dots in the bottom right corner of the page: |

The Download button is displayed:

Click the Download button and select the desired download format. The Export dialog opens.
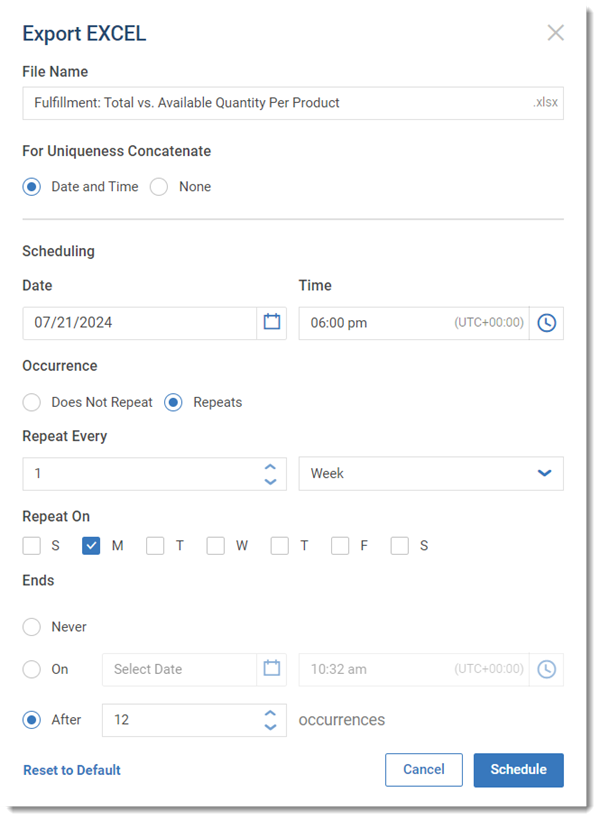
| 2. | In the Export dialog, select your download options: |
| • | File Name—Specify a file name or accept the suggested file name. |
| • | For Uniqueness Concatenate—To ensure the uniqueness of the file name of the export, select Date and Time. Date and time values will be automatically appended to the file name (UTC time). Select None if no timestamp should be appended to the file name. |
| 3. | Click the Schedule link to display the scheduling options. |
| 4. | In the fields provided, select the desired date and time of the export. |
Note:By default, the time is set in UTC. If you are located in a different timezone, adjust the date and time accordingly to allow for the offset.
| 5. | To create a recurring schedule, select Repeats. The Export dialog displays the necessary fields for scheduling recurrence. Complete the fields to define the schedule. |

| 6. | Click Schedule. The export will be performed at the scheduled time, and you (as the logged-in user) will receive an email containing a link that can be used to download the exported file. |